
Beverages
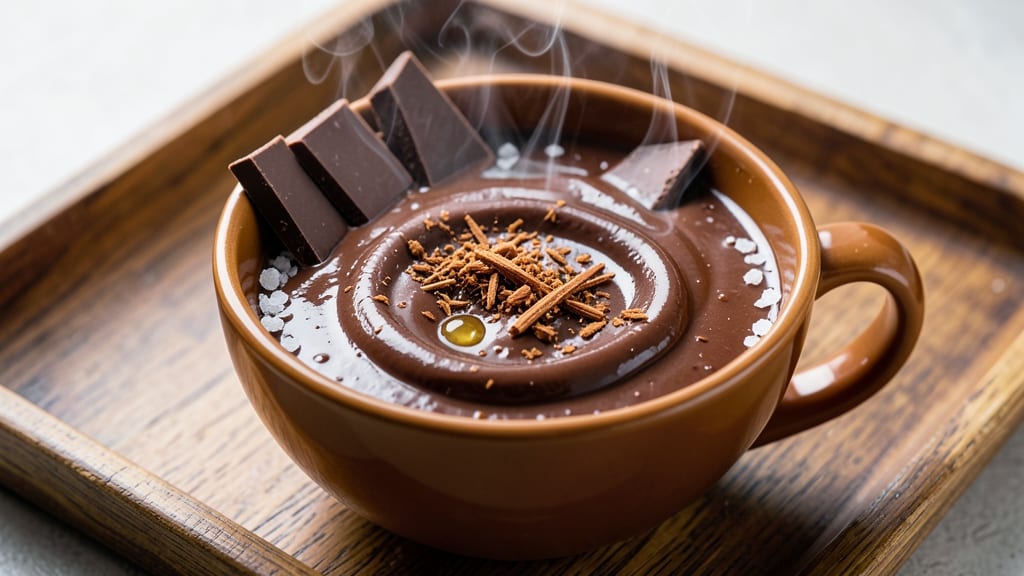
This bakers chocolate hot cocoa recipe transforms your ordinary cocoa nights into a decadent, melt-in-your-mouth experience that tastes like a cozy dessert. The secret? Using high-quality baker’s chocolate instead of cocoa powder—it dissolves into velvety richness that makes every sip feel indulgent.
I’ve been perfecting this recipe for years, and it’s the one people always ask for seconds on.
The magic happens when you melt the chocolate into warm milk on the stove—no microwave required. A pinch of cinnamon and a dash of vanilla elevate the flavor, while a sprinkle of sea salt balances the sweetness.
The result is a thick, luxurious cocoa that’s smoother than anything you’d find in a store-bought mix. It’s the kind of drink that makes winter evenings feel extra special.
Serve it topped with whipped cream and crushed chocolate for that extra touch of decadence, or keep it simple with a dusting of cocoa powder. The texture is creamy but not heavy, and the flavor is so rich it’ll have everyone reaching for seconds.
This isn’t just hot cocoa—it’s a comforting, velvety treat that feels like a hug in a mug.
Perfect for chilly nights, movie marathons, or when you just need a little warmth and sweetness. The best part? It takes less than 10 minutes to make, so you’ll have your cozy drink ready in no time. Let’s get started!
Ingredients for bakers chocolate hot cocoa
Nine ingredients for a luxurious cocoa experience that feels like dessert in a mug.
| Ingredient | Amount | Notes |
|---|---|---|
| Baker's Chocolate Bar 🍫 | 4 oz | High-quality, semi-sweet or dark |
| Whole Milk 🥛 | 2 cups | Warm, not boiling |
| Granulated Sugar 🍚 | ½ cup | Adjust to taste |
| Ground Cinnamon 🌿 | ½ tsp | Freshly ground preferred |
| Pure Vanilla Extract 🍯 | ½ tsp | Or vanilla bean paste |
| Sea Salt 🧂 | ¼ tsp | Fine grain preferred |
| Heavy Whipping Cream 🥛 | ¼ cup | For topping, optional |
| Unsweetened Cocoa Powder 🍫 | 1 tbsp | For dusting, optional |
| Crushed Baker's Chocolate 🍫 | 2 tbsp | For garnish, optional |
The chocolate makes all the difference here. Ghirardelli or Guittard are my go-tos—they melt beautifully and add that velvety texture. Avoid anything with additives or 'chocolate chips' in the name. For the milk, warm it on the stove until it's hot but not boiling—steaming it gently keeps it creamy. If you're using whole milk, it'll be richer, but 2% or even almond milk works too. The sugar is your sweetness control—start with half a cup and adjust if you're serving kids or a sweeter crowd.
No vanilla extract? Vanilla bean paste is a great swap, or even a scraped vanilla bean. Want to cut sugar? Maple syrup or agave works beautifully—just reduce the amount by a third. The cinnamon is non-negotiable for that cozy warmth, but if you're out, nutmeg at half the amount gets you close. For the salt, don't skip it—it balances the sweetness perfectly. If you're making this ahead, store the dry ingredients (chocolate, sugar, spices) separately and add the milk fresh when serving.
This reheats beautifully—just add a splash of milk and warm it through. Keeps 3-4 days in the fridge if you store it properly (sealed container, no milk). The whipped cream and chocolate garnishes are optional but make it feel extra special. I always double the batch—it disappears fast. For a crowd, scale up the chocolate and milk proportionally. The key is patience when melting the chocolate—let it sit off the heat for a minute after it dissolves so it doesn't seize up.
Why You'll Love This Recipe
- Here’s what sold me: that first sip hits like a warm hug, but it’s not cloyingly sweet. The baker’s chocolate brings deep, bittersweet notes that balance the creamy milk perfectly. Plus, the cinnamon adds warmth without overpowering—like a grown-up version of hot cocoa that still feels like a treat.
- I’ll be real: baker’s chocolate isn’t cheap, but one bar stretches into so many mugs. A little sugar, a splash of milk, and a dash of cinnamon—you’re not breaking the bank, but you’re getting a drink that tastes like you spent hours stirring a pot over an open flame. Leftovers? Just reheat and enjoy. No waste, all flavor.
Step-by-step instructions for ultra-rich bakers chocolate hot cocoa
Here's how to create a velvety, decadent hot cocoa that tastes like a dessert in every sip.
Melt the Chocolate Bar Over Gentle Heat
Break the 4 oz Baker's Chocolate Bar into small, even pieces—this ensures faster, more consistent melting. Place them in a heavy-bottomed saucepan and set over medium-low heat. Add the 2 cups of warm whole milk (not boiling) and stir gently with a silicone spatula to help the chocolate dissolve.
Keep the heat at medium-low—this prevents scorching while allowing the chocolate to melt smoothly. You'll know it's ready when the mixture reaches 110°F and becomes completely glossy with no visible chocolate bits. This step builds the rich, velvety base that makes this hot cocoa extraordinary.
Sweeten and Season the Mixture
Remove the saucepan from heat and whisk in the 0.5 cup granulated sugar until fully dissolved. This is where the magic happens—adding sugar off the heat prevents graininess. Then stir in the 0.5 tsp ground cinnamon, 0.5 tsp pure vanilla extract, and 0.25 tsp sea salt.
The salt might seem counterintuitive, but it balances the sweetness and enhances all the chocolate flavors. Taste the mixture now—you'll notice how the cinnamon adds warmth while the vanilla deepens the chocolate's natural richness. Let it sit for 2 minutes to allow the flavors to meld completely.
Create a Lush, Creamy Texture
Return the saucepan to low heat and stir in the 0.25 cup heavy whipping cream. Heat gently for 1-2 minutes until the cream is fully incorporated and the mixture reaches 130°F. This temperature keeps the cocoa warm without cooking the cream.
For an extra touch of decadence, dust the surface with 1 tbsp unsweetened cocoa powder using a fine-mesh sieve. This creates a beautiful contrast and adds depth of flavor. Stir gently to combine—this step makes the hot cocoa look as luxurious as it tastes.
Serve with a Chocolate Garnish
Divide the hot cocoa among four mugs, filling each about ¾ full. Top each serving with 0.5 tbsp crushed Baker's Chocolate for a stunning presentation and an extra burst of chocolate flavor. The crushed chocolate will melt slightly from the heat of the cocoa, creating little pockets of intensified chocolate richness.
Serve immediately with a cinnamon stick or whipped cream for garnish. The contrast between the warm cocoa and the cool, crunchy chocolate garnish makes this drink truly special. Each sip delivers layers of flavor—sweet, spiced, creamy, and intensely chocolaty.
Pro Tips For Making Bakers Chocolate Hot Cocoa
- CHOP THE CHOCOLATE SMALL: I learned this the hard way—big chunks of baker’s chocolate sink like stones and refuse to melt evenly. Use a sharp knife or microplane to chop it into rice-sized pieces. They’ll dissolve smoothly into the milk, giving you that velvety texture instead of lumpy surprises.
- STIR CONSTANTLY ON LOW: That milk will scald faster than you think. Once the chocolate hits the pot, keep it on the lowest heat setting you can tolerate and stir like you’re mixing paint. The second the mixture starts to bubble, remove it from heat—no waiting for "just a little longer." Burnt cocoa tastes like regret.
- WHISK IN THE CINNAMON LAST: Sprinkle that cinnamon in after the chocolate’s fully melted, or you’ll end up with clumpy dust at the bottom of your mug. A quick whisk after adding it ensures every sip gets that warm, cozy spice kick. (Yes, even if you’re impatient like me.)
- USE WARM MILK, NOT COLD: Cold milk makes the chocolate seize up like it’s plotting against you. Heat the milk to just under boiling—about 160°F—before adding the chocolate. It’ll blend into a luscious, silky drink instead of a science experiment. (Pro tip: Test the milk on your wrist—should feel hot but not scalding.)
Troubleshooting this dish
Chocolate Seizes or Grainy
If your cocoa looks grainy or seizes up when melting, you're likely overheating the chocolate. Always melt it over medium-low heat and never let the milk boil—steaming it gently keeps the texture smooth.
For extra insurance, whisk in a splash of hot milk after removing from heat to help emulsify the mixture. I’ve found that using Ghirardelli chocolate bars melts more consistently than budget brands. 🌡️
Too Thin or Watery
A thin cocoa often means you added too much milk or didn’t melt the chocolate thoroughly. Start with 2 cups milk and adjust in ¼ cup increments if needed.
For a thicker texture, reduce the liquid slightly or stir in 1 tbsp cornstarch mixed with 1 tbsp cold water while heating. The goal is a pudding-like consistency—not soupy. A splash of heavy cream at the end also helps thicken it naturally.
Burnt or Bitter Taste
Burnt cocoa usually means the heat was too high or the chocolate sat too long on the stove. Keep your heat at low once the chocolate starts melting, and never let it simmer.
If it starts to smell burnt, immediately remove from heat and stir in ½ tsp vanilla extract to mask any bitter notes. For extra insurance, use a thermometer—remove from heat at 110°F to prevent overheating. 🔥
Lumpy or Uneven Texture
Lumps happen when chocolate doesn’t dissolve completely, often due to uneven heat distribution. Break the chocolate into small, even pieces before melting, and use a silicone spatula to stir gently. If lumps persist, strain the mixture through a fine-mesh sieve into your mugs.
For a silky finish, whisk vigorously for 30 seconds after removing from heat—this helps break up any remaining clumps.
Not Sweet Enough
If your cocoa tastes under-sweetened, it’s usually because the chocolate’s natural sweetness wasn’t balanced. Start with the full ½ cup sugar and adjust in 1 tbsp increments—taste as you go!
For a deeper sweetness without adding sugar, use darker chocolate (60-70% cocoa) or stir in 1 tsp maple syrup at the end. The key is patience—let the flavors meld for 2-3 minutes off the heat before tasting.
Milk Curdles or Splits
Curdling happens when milk is added too hot or when acidity (like citrus) is introduced. Always warm milk to 160°F—not boiling—and avoid adding it to cold chocolate. If curdling occurs, whisk in 1 tsp cornstarch or a splash of cold milk to stabilize the mixture.
For extra richness, use whole milk or half-and-half—they’re less likely to curdle than skim milk. 🥛
Nutrition facts
Frequently asked questions
Can I use dark chocolate instead of baker's chocolate?
Yes, but the texture and flavor will differ slightly. Baker's chocolate is specifically formulated to melt smoothly into a velvety consistency, while dark chocolate bars may contain additives that can make your cocoa grainier. For the best results, use a high-quality 70% cocoa dark chocolate bar and melt it over low heat with constant stirring. The cocoa content should be similar to baker's chocolate (around 50-60%).
How do I make this recipe dairy-free?
Replace the whole milk with 2 cups unsweetened almond milk or oat milk, and use ¼ cup coconut cream instead of heavy whipping cream. For extra richness, add 1 tbsp melted coconut oil when melting the chocolate. The texture will be slightly lighter, but still delicious. Always warm the plant-based milk to 160°F before adding to the chocolate.
Can I make this ahead of time?
Prepare the dry ingredients (chocolate, sugar, cinnamon, vanilla, and salt) in a sealed container and store them separately. When ready to serve, simply add warm milk and heat gently on the stove for 3-4 minutes, stirring constantly. For the best texture, add the cream and garnishes fresh. This method keeps the cocoa flavorful for up to 3 days in the fridge.
What's the difference between baker's chocolate and regular chocolate?
Baker's chocolate is specifically made for baking and melting—it has a higher cocoa content (around 50-60%) and no added fats or emulsifiers that can interfere with texture. Regular chocolate bars often contain lecithin or other additives that can make your cocoa grainy or seize when melted. Baker's chocolate dissolves into a smoother, silkier consistency, which is why it's perfect for this recipe.
Can I use this recipe for a crowd?
Yes! Scale up the recipe by doubling or tripling the ingredients. For 8 servings, use 8 oz baker's chocolate, 4 cups milk, and 1 cup sugar. Keep the same ratios for spices and cream. The key is to use a larger, heavy-bottomed saucepan and maintain low heat to prevent scorching. Serve in a slow cooker or chafing dish to keep the cocoa warm for your guests.