
Desserts
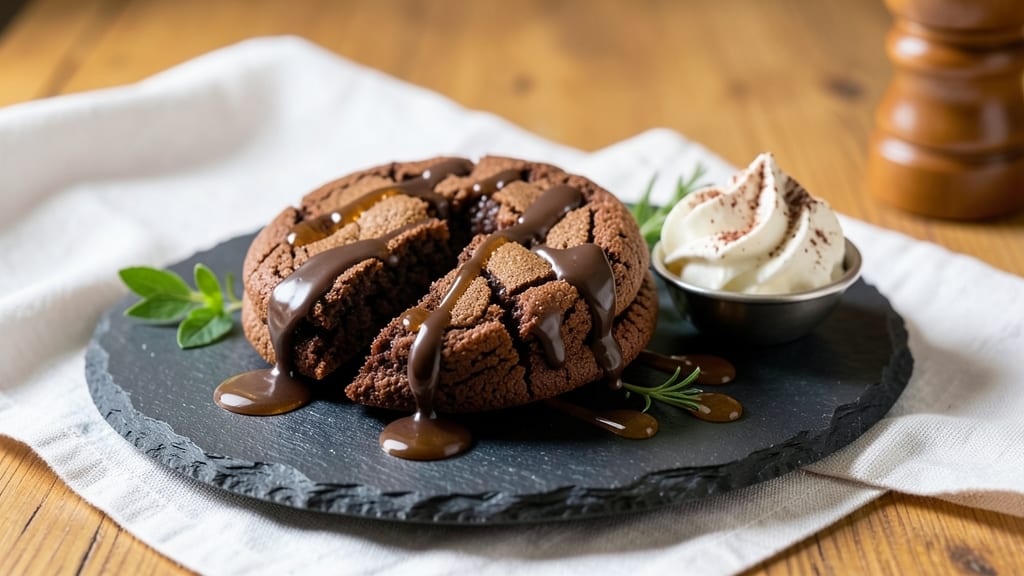
Baker's death by chocolate cookies are the ultimate indulgence—fudgy, rich, and packed with double chocolate chunks that melt into gooey perfection. 💛 These cookies are my go-to for any occasion, from holiday baking to satisfying a late-night sweet tooth. The secret lies in the right balance of cocoa powder, melted chocolate, and brown sugar for that signature texture: crisp edges and a molten center that's impossible to resist.
What sets these apart is the technique: mixing melted chocolate directly into the dough ensures every bite delivers that deep, chocolatey flavor. I've perfected this recipe over years of baking, testing different ratios to get the ideal consistency—neither too cakey nor too crisp.
The addition of chocolate chunks adds pockets of extra richness, making each cookie a little piece of heaven.
Once baked, these cookies develop a beautiful golden-brown crust while staying soft and fudgy inside. The aroma alone will have everyone in the kitchen asking for seconds.
They're perfect for gifting, sharing, or keeping for yourself—though I can't promise you'll have any leftovers. The texture and flavor make them worth every calorie.
The best part? These cookies improve with age, developing even more intense flavor as they sit. Store them in an airtight container for up to a week, or freeze for longer storage.
Whether you're a seasoned baker or just starting out, this recipe delivers restaurant-quality results with minimal effort. Let's get baking!
Ingredients for baker's death by chocolate cookie
Double the chocolate, double the joy—these cookies are pure indulgence in every bite.
| Ingredient | Amount | Notes |
|---|---|---|
| Unsalted Butter 🧈 | 1 cup | Softened but not melted |
| Granulated Sugar 🍚 | 1 cup | White or raw cane sugar |
| Packed Brown Sugar 🍚 | 1 cup | Light or dark brown |
| Dutch-Processed Cocoa Powder 🍫 | ¾ cup | High-quality for rich flavor |
| Large Eggs 🥚 | 2 whole | Room temperature preferred |
| Vanilla Extract 🌿 | 2 tsp | Pure vanilla extract |
| All-Purpose Flour 🌾 | 2 ½ cups | Sifted for light texture |
| Baking Soda 🧂 | ½ tsp | Pure baking soda |
| Salt 🧂 | ½ tsp | Fine sea salt |
| Semisweet Chocolate Chunks 🍫 | 1 ½ cups | High-quality chocolate |
| Semisweet Chocolate Bars 🍫 | 8 oz | Melted for dough |
The cocoa powder and chocolate bars are where the magic happens. Ghirardelli or Hershey's Special Dark are my go-to brands for that deep, rich chocolate flavor—don't skimp on quality here. The butter should be softened but not melted, so take it out of the fridge about 30 minutes before you start. For the chocolate chunks, Enjoy Life or Guittard brands melt beautifully and add those perfect pockets of gooey goodness. If you can't find Dutch-processed cocoa powder, regular cocoa will work, but the flavor will be slightly more acidic. Pro tip: Toast your cocoa powder in a dry pan for 30 seconds to deepen the flavor—trust me on this!
No vanilla extract? Vanilla bean paste or even a scraped vanilla bean works in a pinch. Running out of chocolate chunks? Chop up a chocolate bar into small pieces—just make sure they're the same size so they melt evenly. The eggs should be room temperature for the best texture, but if they're cold, no big deal. For the flour, sifting is key to avoid dense cookies, but if you're in a rush, just whisk it well. The baking soda is non-negotiable—it's what gives these cookies their signature crisp edges. And if you're worried about the dough being too sticky, chill it for 30 minutes before scooping.
These cookies taste even better the next day, so bake a batch and save half for later. Store them in an airtight container at room temperature for up to 5 days, or freeze for 3 months. For gifting, package them in clear cellophane bags with a ribbon—everyone will think you're a pro. The aroma alone will have your house smelling like a chocolate shop. And if you're feeling extra, sprinkle a little extra cocoa powder on top before baking for that restaurant-quality finish.
Why You'll Love This Recipe
- Five-Ingredient Magic: I swear, this recipe is the kind of thing you’ll bookmark and forget exists—until you realize you only need butter, sugars, cocoa, eggs, and zero weird substitutions. The Dutch-processed cocoa alone makes these richer than store-bought, and the creamed butter base means no fussing with melted chocolate messes.
- Fudgy-Crisp Perfection: That crispy edge with the molten center? It’s not luck—it’s the brown sugar caramelizing while the cocoa keeps the inside dangerously soft. Honestly, I’ve tried cutting corners with cheaper cocoa, but nothing beats the deep, velvety bite of this combo.
- Party in a Jar: Between us, these are my go-to for cookie exchanges, potlucks, or just because. They freeze like a dream (no weird texture loss), so I bake a double batch and stash them for months. The eggs add structure, so they won’t crumble when you’re shoving them into your mouth mid-conversation.
- Budget Luxury: You’re paying for quality, not quantity—this recipe uses less butter and sugar than most, but the Dutch cocoa and proper creaming make them taste like a $10 bakery treat. I’ll be real: my grocery bill stays sane, but my kitchen smells like heaven every time.
Step-by-step instructions for fudgy cocoa bombs
Here's how to create decadent, double-chocolate cookies with a perfect fudgy center and crispy edges.
🍳 Step 1: Cream Butter and Sugars Until Light and Fluffy
In a stand mixer fitted with the paddle attachment, beat the 1 cup unsalted butter on medium speed until completely smooth, about 1 minute. Add the 1 cup granulated sugar and 1 cup packed brown sugar, then beat on medium-high speed for 3-4 minutes until the mixture is light, fluffy, and nearly doubled in volume.
This creaming process incorporates air, which creates those beautiful crackly tops and helps the cookies spread just enough. You'll know it's ready when the mixture is pale and ribbons pull back slowly when the paddle is lifted. If you're using a hand mixer, this will take about 5 minutes—don't rush it or your cookies will be dense.
👨🍳 Step 2: Add Eggs, Vanilla, and Dry Ingredients
Add the 2 whole large eggs, one at a time, mixing on low speed for 30 seconds after each addition. Then stir in the 2 teaspoons vanilla extract until fully combined. In a separate bowl, whisk together the 2.5 cups all-purpose flour, 0.75 cup dutch-processed cocoa powder, 0.5 teaspoon baking soda, and 0.5 teaspoon salt.
With the mixer on low speed, gradually add the dry ingredients to the wet mixture. Mix just until combined—you should still see a few flour streaks. Overmixing develops gluten, which makes cookies tough. The dough will be thick and fudgy, almost like cookie dough you'd eat by the spoonful.
🍫 Step 3: Fold in Chocolate and Chill the Dough
Remove the dough from the mixer and gently fold in the 1.5 cups semisweet chocolate chunks using a silicone spatula. Make sure they're evenly distributed throughout the dough. In a separate small bowl, melt the 8 ounces semisweet chocolate bars in 10-second bursts in the microwave, stirring between each burst until completely smooth. Let it cool slightly, then fold it into the dough.
Cover the dough with plastic wrap and refrigerate for at least 1 hour (or up to 24 hours). Chilling firms up the butter, which prevents excessive spreading in the oven. It also allows the flour to fully hydrate, creating a better texture. This step is crucial—skipping it results in flat, cakey cookies instead of thick, fudgy bombs.
🔥 Step 4: Bake to Golden Perfection
Preheat your oven to 350°F and line two baking sheets with parchment paper. Using a 2-tablespoon cookie scoop, portion the chilled dough into balls and place them 2 inches apart on the prepared sheets. Flatten each ball slightly with your palm to create 1-inch thick cookies.
Bake for 12-14 minutes until the edges are set and the tops are cracked but not fully browned. The centers should still look slightly underdone—they'll continue cooking on the hot pan. Let them cool on the baking sheet for 5 minutes before transferring to a wire rack. The cookies will firm up as they cool, but they'll still be soft and fudgy inside.
⏰ Step 5: Rest and Enjoy (This is the Best Part!)
Wait at least 15 minutes before serving—this allows the cookies to set up properly. They'll be soft and gooey in the center with crispy edges, and each bite will be packed with melted chocolate goodness. Store in an airtight container at room temperature for up to 5 days, though they won't last that long with chocolate lovers around!
Here's the thing—these cookies are so rich that a small portion goes a long way. I always make extra because they disappear faster than you can say "double chocolate." Serve with a glass of cold milk for the ultimate indulgence.
Pro Tips For Making Baker'S Death By Chocolate Cookie
- CREAM THE BUTTER SLOWLY: Mix the butter, granulated sugar, and brown sugar at medium speed until the dough is light and fluffy—about 2 minutes. I used to rush this, and the cookies turned dense. Let the mixer do the work; you’ll know it’s ready when the dough leaves a trail on the paddle.
- SIFT THE COCOA FIRST: Dutch-processed cocoa powder loves to clump. Sift it directly into the dry ingredients before adding wet components—this ensures even distribution and prevents lumpy dough. (Yes, even if you’re impatient, skip the spoon.)
- UNDERBAKE BY 30 SECONDS: These cookies spread fast. Pull them when edges are set but centers still look slightly soft—about 10-12 minutes total. They’ll firm up as they cool, but overbaking turns them dry. A toothpick with moist crumbs is the goal.
- CHILL THE DOUGH TWICE: Divide the dough into discs, then refrigerate for 30 minutes before baking. This prevents excessive spreading. For extra insurance, freeze discs for 20 minutes—works like a charm, even in summer kitchens. (Your future self will curse you if you skip this.)
Pro cooking tips for great baker's death by chocolate cookie
Creaming Like a Pro
The butter-sugar creaming stage is where the magic begins. Use a stand mixer with paddle attachment for best results—this incorporates air more efficiently than a hand mixer. Beat the 1 cup unsalted butter on medium speed until completely smooth (about 1 minute), then add sugars gradually.
The goal is light, fluffy peaks that hold their shape when the paddle is lifted. I've found that 5 minutes with a hand mixer works, but you'll need to scrape the bowl often to prevent graininess. 💛
Dough Chilling Secrets
Never skip chilling the dough! Cover it tightly with plastic wrap and refrigerate for at least 1 hour—this firms the butter, preventing excessive spreading. For even better results, chill overnight. The dough should be firm enough to hold its shape when scooped.
Pro tip: Freeze the dough balls for 15 minutes before baking if you're in a hurry—they'll behave like perfectly chilled dough.
Chocolate Integration
For that signature double chocolate experience, melt 8 oz semisweet chocolate bars in 10-second microwave bursts, stirring between each. Let it cool slightly (about 2 minutes) before folding into the dough to prevent melting the butter.
Use high-quality chocolate chunks like Ghirardelli or Enjoy Life—cheaper brands often contain stabilizers that make them dry and crumbly. Distribute them evenly for consistent melty pockets in every bite.
Baking Precision
Preheat your oven to 350°F and use parchment-lined baking sheets for easy release. Place dough balls 2 inches apart—they'll spread about ½ inch. Bake for 12-14 minutes until edges are set but centers still look soft.
The cracked tops are your indicator of perfect doneness. Let cookies rest on the sheet for 5 minutes before transferring—they'll firm up as they cool but stay fudgy inside.
Equipment Upgrades
Invest in a 2-tablespoon cookie scoop for consistent sizes—this ensures even baking. I use a Lodge preheated cast iron skillet for the first 2 minutes after baking to create that signature crispy bottom.
For chocolate melting, a double boiler gives you more control than the microwave. And always use Dutch-processed cocoa powder—it's less acidic and gives a richer flavor than regular cocoa. ✨
Troubleshooting Guide
If your cookies spread too much, your butter wasn't chilled enough—next time, refrigerate the dough longer. For flat cookies, try baking at 325°F instead. Too cakey? Reduce flour by ¼ cup next batch.
And if your chocolate chunks don't melt properly, they might be old—replace them with fresh bars. The key is patience: these cookies need time to develop their perfect texture. 🔥
Nutrition facts
Frequently asked questions
Why do these cookies need to chill overnight?
Chilling the dough for at least 1 hour (or overnight) is crucial for two reasons: it firms up the butter to prevent excessive spreading, and it allows the flour to fully hydrate for that perfect fudgy texture. Skipping this step often results in flat, cakey cookies instead of the thick, crackly-edged bombs you want.
Can I substitute dark chocolate for semisweet?
Yes, but adjust the amount! Dark chocolate (60-70% cocoa) is more intense, so use 6 oz instead of 8 oz to maintain balance. For the chunks, you can use dark chocolate too—just reduce to 1 cup since it's stronger in flavor. The cookies will be richer but slightly less sweet.
How do I fix cookies that spread too much?
If your cookies flatten out, your dough wasn't chilled long enough. Next time, refrigerate for 24 hours or freeze dough balls for 15 minutes before baking. Also try baking at 325°F instead of 350°F—the lower heat gives the cookies more structure to hold their shape.
What's the best way to store these cookies?
For maximum freshness, store in an airtight container at room temperature for up to 5 days. For longer storage, freeze the baked cookies (not dough) for up to 3 months. The flavor actually improves over time—these cookies taste even better the next day!
Can I make these cookies gluten-free?
Replace the 2.5 cups all-purpose flour with a 1:1 gluten-free baking flour blend (like Bob's Red Mill). Add ½ teaspoon xanthan gum if your blend doesn't contain it. The texture will be slightly different but still delicious—just expect them to be a bit more crumbly.