
Desserts
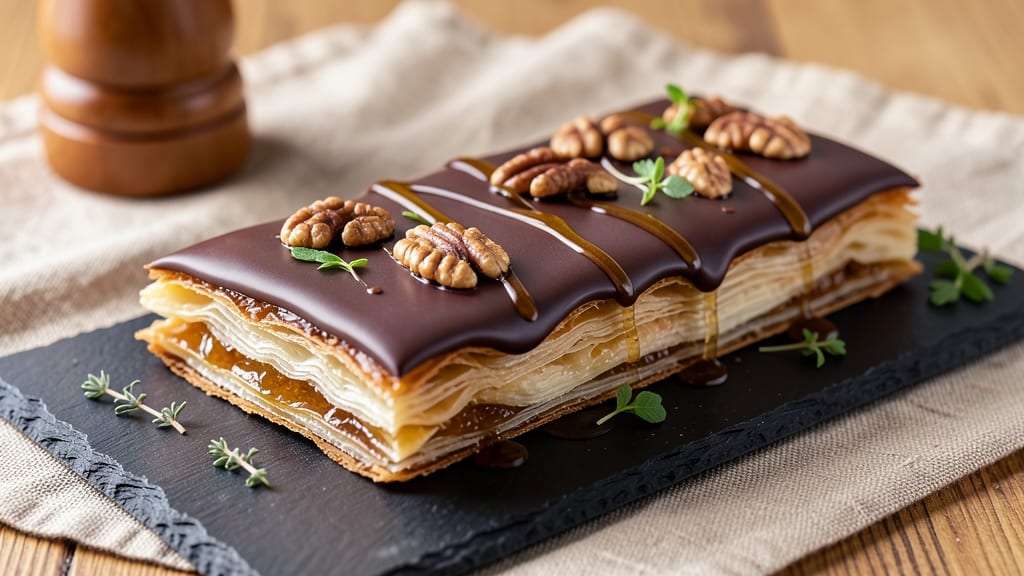
This baklava chocolate bar recipe reimagines a Middle Eastern classic with a decadent twist—crisp phyllo layers sandwiching a rich, nutty-chocolate filling, all topped with glossy dark chocolate. 🌟 The fusion of traditional techniques with modern chocolate elements creates a dessert that's both nostalgic and surprisingly innovative, perfect for satisfying chocolate cravings with a sophisticated touch.
What sets this recipe apart is the balance of textures: delicate, flaky phyllo contrasts beautifully with the fudgy chocolate-nut mixture, while the final chocolate drizzle adds an elegant finish.
The process requires precision—layering the phyllo correctly and baking at the right temperature—but the result is worth every effort, delivering a dessert that's impressive yet approachable for home bakers.
The nutty-chocolate filling combines chopped walnuts, honey, and melted chocolate for depth of flavor, while the phyllo layers provide that signature crispness. This recipe transforms a traditional baklava into a modern chocolate bar, making it ideal for gifting, holiday entertaining, or indulging yourself after a long week.
Ready in about 1 hour (including cooling time), this dessert requires just 8 ingredients and a few simple tools. Whether you're a seasoned baker or a beginner, the step-by-step instructions will guide you through creating a showstopping treat that blends cultural tradition with contemporary creativity.
Ingredients for baklava chocolate bar
Eight essential ingredients blend tradition with decadence for a baklava-inspired chocolate masterpiece.
| Ingredient | Amount | Notes |
|---|---|---|
| Phyllo Dough Sheets 🍰 | 1 package | Thawed if frozen, kept covered |
| Dark Chocolate Chips 🍫 | 1 ½ cups | 70% cocoa minimum for depth |
| Walnuts 🥜 | 1 ½ cups | Chopped, toasted for enhanced flavor |
| Honey 🍯 | ½ cup | Light or medium amber preferred |
| Unsalted Butter 🧈 | ½ cup | Melted, full-fat for richness |
| Vanilla Extract 🌸 | 1 tsp | Pure, high-quality vanilla |
| Salt 🧂 | ¼ tsp | Fine sea salt for balance |
| Ground Cinnamon 🌿 | ½ tsp | Freshly ground for warmth |
The phyllo dough is non-negotiable for that signature crispness—Filomena brand from specialty stores delivers the best results, but any high-quality phyllo works. Keep the package covered with a damp towel to prevent drying while working. For the walnuts, toasting in a dry pan for 3-4 minutes enhances their natural oils and flavor, which is critical for the filling's depth. If you can't find 70% dark chocolate chips, Lindt Excellence or Ghirardelli brands are excellent alternatives, ensuring that rich cocoa flavor essential for balancing the sweetness. The honey should be light amber—avoid dark varieties, which can overpower the delicate chocolate notes.
No honey? Maple syrup or agave nectar at the same quantity works beautifully, though the flavor profile shifts slightly. Want extra richness? Swap half the butter for melted coconut oil—it adds a subtle tropical note that pairs surprisingly well. If you're avoiding gluten, ensure your phyllo dough is certified gluten-free (some brands offer it), though traditional phyllo is naturally gluten-free. For cinnamon, ground Ceylon cinnamon offers a more complex flavor than cassia, but regular cassia works in a pinch. The vanilla extract should be pure, not imitation—Madagascar Bourbon vanilla adds a floral depth that complements the chocolate perfectly.
Phyllo dough must be used within 2 hours of thawing—it dries out quickly. Store any unused sheets between layers of parchment paper in the fridge for up to 3 days. The finished chocolate bars keep well in an airtight container at room temperature for 5-7 days, though they're best enjoyed within 3 days for optimal texture. For gifting, wrap individual bars in parchment paper and tie with twine—presentation matters as much as taste in this dessert. Freezing isn't recommended, as it can make the phyllo soggy.
Why You'll Love This Recipe
- Here’s the thing: these bars keep for days in the fridge, but they won’t last that long. The honey keeps them moist, the chocolate stays rich, and the crunch? Still perfect. I’ve wrapped them in parchment, tied with twine, and gifted them—because they’re that good, even after sitting around.
- No Phyllo Struggles: I’ve burned more phyllo dough than I’d admit, but this recipe actually forgives mistakes. Just brush those sheets with butter—no fussy layering, no cracking—then pile on the chocolate and nuts. Honestly, even if it looks lumpy, it still tastes like a bakery made it.
- Crunch-Meets-Cream Magic: That first bite? Pure contrast—crispy phyllo edges give way to gooey honey-soaked chocolate, while the walnuts add a buttery crunch. I’ll be real: it’s the kind of dessert that disappears in seconds, and I’m not even exaggerating.
- Party Hack Ready: Need something impressive but effortless for guests? These bars cut into neat squares, stack like a cake, and no one will guess how little time they took. Between us, I’ve served them at book clubs, holiday parties, and even a last-minute potluck—every time, they’re the first to vanish.
Step-by-step instructions for baklava chocolate bars
Layer crispy phyllo with nutty filling, then melt chocolate into decadent bars.
👨🍳 Step 1: Prepare the Nut-Flavored Filling
In a medium saucepan, melt the ½ cup unsalted butter over low heat until completely liquid. Remove from heat and stir in the 1.5 cups chopped walnuts, ½ cup honey, 1 tsp vanilla extract, ½ tsp ground cinnamon, and ¼ tsp salt. Let the mixture cool to room temperature—this prevents the phyllo from becoming soggy when layered.
Here's the thing—I like to press the walnuts between two sheets of parchment paper with a rolling pin before chopping. This creates finer pieces that distribute more evenly throughout the filling. The mixture should be thick but spreadable, like a stiff paste. If it's too dry, add 1 teaspoon honey; if too wet, toast the walnuts longer next time.
🥘 Step 2: Assemble the Phyllo Layers
Preheat your oven to 350°F and line a 9x13-inch baking pan with parchment paper, leaving an overhang on the sides for easy removal. Uncover the 1 package phyllo dough sheets and keep the remaining sheets covered with a damp towel to prevent drying. Working quickly, brush each sheet lightly with melted butter using a pastry brush—this creates a delicate, crispy texture.
Layer 4 sheets of phyllo in the pan, brushing each with butter between layers. Spread ⅓ of the nut mixture evenly over the phyllo, leaving a ½-inch border around the edges. Repeat with another 4 sheets of phyllo, brushing each with butter, then another ⅓ of the nut mixture. Finish with the last 4 sheets of phyllo, brushing each with butter. The final layer should be smooth and even—press down gently with your fingers to eliminate any air pockets.
🔥 Step 3: Bake Until Golden and Crisp
Bake for 35-40 minutes until the edges are deep golden brown and the center feels firm when pressed. You'll know it's done when the top layer is crisp and the bottom doesn't jiggle. Here's a pro tip: I like to rotate the pan halfway through baking to ensure even browning. The filling should be fully set but still slightly soft in the center—it'll firm up as it cools.
Remove from the oven and let the bars cool completely in the pan. This resting period is crucial—it allows the layers to set properly and prevents the chocolate from melting too quickly when you add it later. If you can't wait, resist the urge to cut into them early. Patience here ensures clean slices and a perfect texture.
🍫 Step 4: Melt and Layer the Chocolate
In a microwave-safe bowl, melt the 1.5 cups dark chocolate chips in 30-second intervals, stirring between each interval until fully smooth. The chocolate should reach 110°F—just warm enough to pour but not so hot it burns the phyllo layers. Pour the melted chocolate evenly over the cooled phyllo bars, spreading it into the corners with a spatula. Let it set at room temperature for 30 minutes.
For a restaurant-quality finish, chill the bars in the refrigerator for 15 minutes after the chocolate sets. This firms up the chocolate layer, making it easier to slice into clean, crisp bars. Once fully set, use the parchment overhang to lift the bars out of the pan and cut into 12 even rectangles. The contrast of crisp phyllo, nutty filling, and rich chocolate creates a perfect balance of textures and flavors.
Pro Tips For Making Baklava Chocolate Bar
- MELT THE CHOCOLATE RIGHT: Mix the dark chocolate chips with walnuts first, then warm the bowl in 10-second bursts in the microwave—stirring like you’re frantic—until smooth but not greasy. I learned this the hard way: overdoing it turns the filling into a sad, grainy paste that won’t hold together.
- BRUSH BUTTER THINLY: Use a pastry brush and just enough melted butter to coat each phyllo sheet—about ½ teaspoon per sheet—so they stay pliable but don’t get soggy. Too much butter = a chewy, greasy mess; too little = brittle layers that snap like kindling.
- PRESS THE FILLING FIRM: Pack the chocolate-walnut mix into the phyllo layers tightly—press it down like you’re making a sandwich, not just sprinkling. Loose filling slides around during baking, leaving gaps that turn crispy instead of gooey.
- BAKE UNTIL GOLDEN, NOT DONE: Pull the bars when the edges are deep golden (around 350°F for 20-25 minutes), not when the center looks set. The honey keeps cooking after baking—overdo it, and you’ll end up with burnt edges and a dry, crumbly center.
Storing and reheating your leftovers
Room Temperature Storage
Store your baklava chocolate bars in an airtight container at room temperature for up to 5-7 days. The phyllo stays crisp best when protected from moisture—place a slice of bread in the container to absorb any excess humidity.
I like using glass containers with tight-sealing lids like those from Weck or Pyrex to maintain freshness. Keep them away from direct sunlight to prevent the chocolate from melting or becoming grainy. 🌟
Fridge Preservation
For longer storage, transfer the bars to the fridge where they’ll keep for up to 10 days. The cold temperature helps preserve the crispness of the phyllo layers, though the chocolate may develop a slight bloom (white residue) over time—this is normal and doesn’t affect flavor.
Wrap individual bars in parchment paper before storing to prevent sticking. When ready to serve, let them sit at room temperature for 10-15 minutes to soften the chocolate slightly. ❄️
Reheating Methods
If the chocolate hardens too much, warm the bars gently in a 200°F oven for 3-5 minutes to restore their fudgy texture. For a quick fix, place the bars in a microwave-safe dish and heat on low power (30% setting) for 10-15 seconds.
Avoid overheating—the phyllo can become soggy if exposed to high heat for too long. I prefer the oven method for even warming without risking texture loss. 🔥
Freezing for Gifting
While not ideal, you can freeze these bars for up to 1 month if wrapped tightly in plastic wrap followed by aluminum foil. Thaw at room temperature for 1-2 hours before serving. The phyllo may lose some crispness after freezing, but the chocolate and nut filling remain delicious.
For gifting, freeze the bars individually wrapped in parchment paper and tie with twine—this keeps them stable during shipping. ❄️
Chocolate Bloom Fix
If your chocolate develops a white, powdery coating (bloom), it’s still safe to eat—just not as visually appealing. To restore shine, gently warm the bars in the oven at 180°F for 2 minutes, then let them cool.
The heat re-melts the cocoa butter crystals, smoothing the surface. For a quick fix, rub the bars lightly with a damp paper towel before the chocolate fully sets—this removes excess sugar crystals. 💫
Serving Suggestions
Serve these bars at room temperature for the best texture contrast. Pair them with a strong Turkish coffee or espresso to complement the nutty and chocolatey flavors. For a festive touch, dust the bars with powdered sugar or cocoa powder before serving.
Store leftovers in the fridge and reheat briefly before enjoying—this dessert tastes even better the next day! 🍫
Nutrition facts
Frequently asked questions
Can I substitute walnuts for another nut in this recipe?
Pistachios or almonds work beautifully—they add a slightly different texture but still pair well with chocolate. For a richer flavor, try pecans or hazelnuts, but toast them first to enhance their natural oils. Just keep the total nut quantity at 1.5 cups for the right balance.
Why is my phyllo dough getting soggy before baking?
This usually happens if the nut filling isn't fully cooled before layering or if the phyllo sheets aren't properly brushed with butter. Always let the filling cool completely (about 20 minutes) and work quickly with the phyllo, keeping unused sheets covered with a damp towel. Brush each layer generously with melted butter—this creates a moisture barrier that keeps things crisp.
Can I make this recipe without honey?
Yes! Swap the honey for ½ cup maple syrup or agave nectar for a similar sweetness level. For a deeper flavor, try 1 tablespoon of molasses mixed with ¼ cup maple syrup. The texture may be slightly stickier, so adjust by adding 1 teaspoon extra butter to the filling if needed.
How do I prevent the chocolate from melting when cutting?
Chill the bars in the fridge for 15 minutes before cutting to firm up the chocolate layer. Use a sharp knife and cut through the parchment paper for clean slices. For extra stability, place the pan in the freezer for 5 minutes before cutting—this works like a temporary "ice bath" for the chocolate.
Is this recipe gluten-free?
Traditional phyllo dough contains wheat, so this recipe isn't gluten-free. However, you can use gluten-free phyllo sheets (like those from Filomena GF or Annie's) for a safe alternative. The texture will be slightly different—expect less crispness—but the flavor remains delicious. Always check labels, as gluten-free phyllo often requires extra butter for moisture.