
Desserts
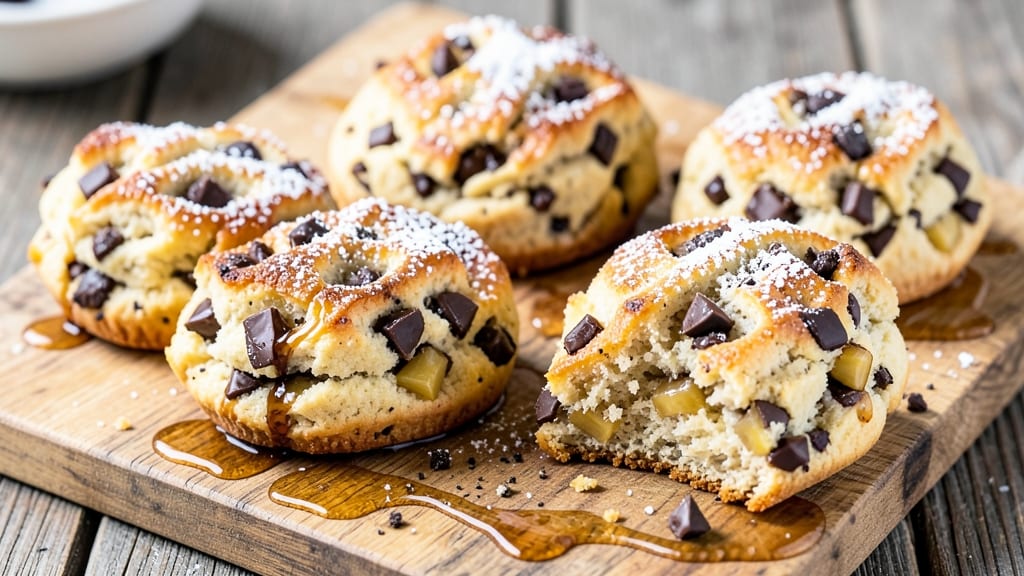
This banana chocolate scones recipe delivers the perfect balance of tender crumb and crispy edges, with swirls of melted chocolate that make every bite irresistible. 🌟 The secret lies in using ripe bananas for natural sweetness and a touch of cornstarch to ensure that signature flaky texture—no one will guess how simple the technique is.
I've perfected this recipe over years of baking, and it consistently produces golden, aromatic scones that disappear faster than they cool.
The magic happens when you fold in chunks of dark chocolate and swirl them through the dough before baking, creating pockets of gooey goodness that contrast beautifully with the crispy exterior. These scones are ideal for breakfast or dessert, and they freeze beautifully for quick treats on busy mornings.
The combination of warm spices like cinnamon and nutmeg enhances the banana flavor, while a hint of vanilla adds depth that makes them taste homemade.
By the time they emerge from the oven, your kitchen will smell like a bakery, and the scent alone will have everyone gathering around. The edges will be perfectly golden and crisp, while the centers remain soft and tender—just the way you want them.
Serve them warm with a pat of butter or a drizzle of honey for the ultimate indulgence that feels special without requiring hours of effort.
This recipe is designed to be foolproof, with clear instructions that ensure success every time. Whether you're a beginner or an experienced baker, these scones will become a staple in your rotation. Let's get started on creating something that tastes like comfort and warmth in every bite.
Ingredients for banana chocolate scones
Ripe bananas and rich chocolate transform simple pantry staples into irresistible golden scones.
| Ingredient | Amount | Notes |
|---|---|---|
| All-Purpose Flour 🌾 | 3 cups | Sifted for light texture |
| Granulated Sugar 🍚 | ¾ cup | White or light brown |
| Cornstarch 🌾 | 2 tbsp | For flaky texture |
| Baking Powder 🧂 | 2 tsp | Aluminum-free preferred |
| Salt 🧂 | ½ tsp | Fine sea salt |
| Ground Cinnamon 🌿 | 1 tsp | Freshly ground preferred |
| Ground Nutmeg 🌿 | ¼ tsp | Freshly grated |
| Cold Unsalted Butter 🧈 | 1 cup | Cut into cubes |
| Ripe Bananas 🍌 | 1 ½ cups | Mashed, spots preferred |
| Vanilla Extract 🍯 | 1 tsp | Pure vanilla preferred |
| Dark Chocolate Chunks 🍫 | 1 cup | 70% cacao minimum |
| Heavy Whipping Cream 🥛 | ¼ cup | Cold for swirling |
| Powdered Sugar 🍚 | ½ cup | For dusting |
The bananas are non-negotiable—look for ones with brown spots at Whole Foods or your local market, as they're sweeter and mash more easily. Dark chocolate matters too: 70% cacao or higher from Ghirardelli or Lindt gives that deep, complex flavor. The butter should be cold (I pop it in the freezer for 15 minutes before cutting) to ensure those perfect flaky layers—no cutting into warm butter. For the flour, King Arthur or Gold Medal brands are my go-to for consistent results.
No ripe bananas? Use 1 medium banana plus 1 tbsp maple syrup to mimic the sweetness. Short on chocolate? Chop a 7-ounce bar into chunks yourself—pre-chopped pieces melt faster. The cream can be swapped for Greek yogurt if you're avoiding dairy, though it'll be slightly less fluffy. For extra richness, add 1 tbsp sour cream to the dough. And if you're feeling fancy, fold in toasted pecans for crunch.
These scones freeze beautifully—wrap cooled slices in parchment and store for up to 3 months. To reheat, pop them in a 350°F oven for 5-7 minutes. For best freshness, bake only what you'll eat in 2 days. I like to portion the dough into balls before baking (about 1.5 oz each) for consistent size. The powdered sugar dusting? Do it right after baking while they're still warm.
Why You'll Love This Recipe
- No Muffin Tin Needed: I swear by this trick—just drop the dough onto a lined baking sheet instead of a muffin tin. No fussing with greasing, no tiny compartments to remember, and those scones get that perfect golden crust without sticking. (Between us, I’ve burned more than one batch in tins. This method saves me every time.)
- Ripe Banana Rescue: Honestly, overripe bananas are my secret weapon here. That mushy sweetness turns into a tender, cake-like crumb while the melted chocolate swirls through like a molten river. No one will guess you used fruit that was almost too soft to eat.
- Breakfast or Snack Hero: I make these for my kids’ lunches, my book club meetings, or when I just need a quick pick-me-up. The cornstarch keeps them light enough for breakfast but sturdy enough to pack—no soggy bottoms here. (Yes, even on a Tuesday night.)
- Pantry Staple Magic: All the ingredients are things I already have: flour, sugar, a pinch of salt. No specialty items, no last-minute grocery runs. Double the batch, freeze half, and you’ve got a dessert ready in 10 minutes. My wallet and my taste buds thank me.
Step-by-step instructions for banana chocolate scones
Here's how to achieve that perfect balance of tender crumb and crispy edges with these decadent scones.
👨🍳 Step 1: Prepare the Dry Ingredients
In a large mixing bowl, combine the 3 cups all-purpose flour, 2 tbsp cornstarch, 2 tsp baking powder, 0.5 tsp salt, 1 tsp ground cinnamon, and 0.25 tsp ground nutmeg. Whisk gently to distribute the spices evenly through the flour. I like to use a fork for this step to avoid developing too much gluten, which keeps the scones tender.
For best results, sift the flour mixture before adding it to the bowl. This ensures a light, airy texture in your finished scones. Set this mixture aside while you prepare the wet ingredients—don't let it sit too long or it might absorb moisture from the air.
🍳 Step 2: Cut in the Cold Butter
Add the 1 cup cold unsalted butter (cut into cubes) to the dry ingredients. Using a pastry cutter or your fingers, work the butter into the flour mixture until it resembles coarse crumbs with pea-sized butter pieces still visible. This texture is crucial—it creates those flaky layers when baked.
I press down gently on the butter pieces during the first minute to break them down, then switch to a cutting motion to distribute them evenly. If the mixture starts to look like wet sand, it means the butter has warmed up too much—return it to the refrigerator for 5 minutes to reset before continuing.
👨🍳 Step 3: Mix the Wet Ingredients
In a separate bowl, mash the 1.5 cups ripe bananas until smooth, then stir in the 1 tsp vanilla extract. The bananas should be fully broken down with just a few small lumps remaining—this gives the scones their signature moistness without making them too dense.
Add this banana mixture to the butter-flour mixture along with the 0.25 cup heavy whipping cream. Stir gently with a wooden spoon just until combined—overmixing develops gluten and makes the scones tough. You'll see streaks of flour, and that's exactly what you want.
🥘 Step 4: Form and Swirl the Dough
Turn the dough out onto a lightly floured surface and pat it into a 1-inch thick rectangle. Sprinkle the 1 cup dark chocolate chunks evenly over the top half of the dough, then fold the bottom half up to cover them. Press gently to seal the edges.
Roll the dough into a 10-inch log and wrap it in plastic wrap. Chill in the refrigerator for 30 minutes—this resting period relaxes the gluten and makes slicing easier. While it chills, preheat your oven to 375°F for that perfect crispy exterior.
🔥 Step 5: Bake to Golden Perfection
Unwrap the chilled dough and slice it into 8 equal wedges. Place them on a parchment-lined baking sheet, spacing them about 1 inch apart—they'll spread slightly during baking. Bake for 15-18 minutes until the edges are deep golden brown and the tops look slightly cracked.
For extra crispy edges (which I know you're aiming for), I rotate the baking sheet halfway through the baking time. This ensures even browning on all sides. Let the scones cool on the baking sheet for 5 minutes before transferring to a wire rack to finish cooling.
🍽️ Step 6: Serve Warm with Powdered Sugar
While still warm, dust the scones generously with 0.5 cup powdered sugar using a fine-mesh sieve. The heat from the scones will make the sugar melt slightly, creating a beautiful dusting effect. Serve immediately with a cup of coffee or tea—these scones are best enjoyed fresh from the oven.
Each bite should deliver a perfect balance of tender banana flavor, rich chocolate chunks, and that satisfying crispy edge. If you're feeling fancy, add a dollop of whipped cream or a pat of butter on the side for extra indulgence.
Pro Tips For Making Banana Chocolate Scones
- CHILL THE DOUGH: I learned this the hard way—overworked dough makes tough scones. After mixing, press the dough into the pan and refrigerate for 15 minutes. This keeps the texture tender and prevents spreading when baking.
- MASH BANANAS WELL: No one likes gummy scone bites. Mash the bananas until smooth—no lumps—so they blend fully into the batter. If they’re too watery, drain excess liquid through a fine-mesh sieve to avoid dense scones.
- DON’T OVERMIX THE DRY INGREDIENTS: Once you add the wet ingredients, mix just until combined. Overmixing develops gluten, which makes scones tough. Stop when the flour is mostly incorporated—lumps are fine.
- USE COLD BUTTER: Cut the butter into small cubes and chill them before mixing. Cold butter creates flaky layers, while warm butter makes scones greasy and dense. If your kitchen’s hot, pop the butter in the freezer for 5 minutes first.
Serving suggestions for this recipe
Morning Coffee Pairing
Serve these scones warm with a bold dark roast like Starbucks Sumatra or Peet's Major Dickason's Blend—the deep, earthy notes complement the chocolate perfectly. For a lighter option, try a lavender-infused latte from Blue Bottle Coffee; the floral aroma enhances the banana's natural sweetness. 💛
Afternoon Tea Elevation
Turn your scones into a proper tea-time treat by serving them with Earl Grey or Darjeeling—the bergamot and floral notes create a sophisticated contrast. Add a clotted cream and strawberry jam trio for a British-inspired spread. For a modern twist, drizzle with honeycomb-infused honey from Local Honey Co.
Dessert with Whipped Cream
Top each scone with a generous dollop of homemade whipped cream sweetened with vanilla bean paste and a pinch of sea salt. For extra decadence, add a sprinkle of crushed pistachios or toasted coconut flakes.
The contrast of creamy, salty, and nutty flavors takes these scones to the next level.
Breakfast with Yogurt
Serve warm scone slices alongside Greek yogurt topped with granola and sliced strawberries. The yogurt's tanginess balances the sweetness, while the granola adds crunch. For a protein boost, stir in chia seeds or almond butter into the yogurt before serving. Perfect for a healthy yet indulgent breakfast!
Giftable Presentation
Wrap cooled scones in parchment paper and tie with twine for a charming gift. Add a small jar of honey or chocolate sauce on the side. For a festive touch, dust with edible gold leaf or sprinkle with crushed freeze-dried raspberries for color.
These make stunning gifts for brunch hosts or office colleagues.
Leftovers Reinvented
Toast leftover scones in a toaster oven at 350°F for 3-4 minutes until crispy. Serve with peanut butter and banana slices for a fun twist on PB&J. Or crumble them over vanilla ice cream for a no-bake dessert. The possibilities are endless—no waste here! ✨
Nutrition facts
Frequently asked questions
Can I substitute regular chocolate chips for the dark chocolate chunks?
You can use chocolate chips, but they melt faster than chunks, which can make the scones denser. For best results, use 70% cacao dark chocolate chunks or melt chocolate chips and spread them between layers of dough before folding. If using chips, chill the dough longer (45 minutes) to prevent melting.
Why are my banana chocolate scones dense instead of flaky?
Dense scones usually mean overmixing or warm butter. Use cold butter cubes and work quickly when cutting it into the flour. Also, avoid pressing the dough when shaping—just gently pat it. If the dough feels sticky, chill it longer (45 minutes) before baking.
How do I make these scones gluten-free?
Replace the all-purpose flour with a 1:1 gluten-free baking flour blend (like Bob's Red Mill) plus an extra 1 tsp xanthan gum. Use 1.5 cups of the blend instead of 3 cups flour. For texture, add 2 tbsp cornstarch to the dry ingredients. Keep the rest of the recipe the same.
Can I add nuts or dried fruit to these scones?
Try ½ cup chopped walnuts or pecans for crunch, or ½ cup dried cranberries for tartness. Fold them in with the chocolate chunks before rolling the dough. For extra moisture, reduce the cream by 1 tbsp if adding dried fruit. Toast nuts first for enhanced flavor!
How long can I store baked scones?
Store in an airtight container at room temperature for 2 days or freeze for up to 3 months. To reheat, warm in a 350°F oven for 5-7 minutes until edges are crispy. For best texture, bake fresh scones whenever possible—they're at their peak within 48 hours.