
Desserts
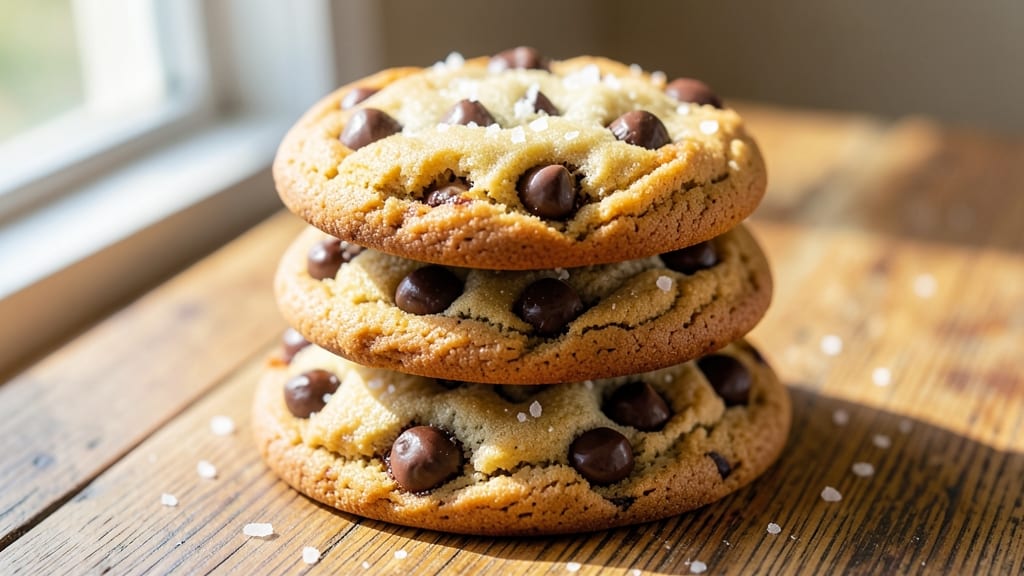
This brown butter chocolate chip cookie recipe delivers the best ever combination of nutty depth and caramelized chocolate chunks—every bite is worth the wait. The secret lies in properly browning the butter for that rich, toasty flavor, then folding in high-quality chocolate chips that melt into gooey perfection.
I've perfected this recipe over years of baking, ensuring crisp edges, chewy centers, and a texture that's impossible to resist.
The process starts with carefully browning the butter until it develops those beautiful nutty aromas and golden flecks, then cooling it just enough to prevent melting the dough. Quality ingredients make all the difference—using real vanilla extract, high-fat butter, and premium chocolate chips transforms this into something restaurant-worthy.
The dough gets chilled for 30 minutes to develop flavor and prevent spreading, while baking at the right temperature ensures even golden-brown cookies.
What sets these apart is the balance of textures: crispy edges that give way to tender, chewy centers, all studded with caramelized chocolate chunks. The brown butter adds complexity that store-bought versions can't match, while the vanilla and sea salt elevate every bite.
This isn't just another cookie recipe—it's the kind that becomes a family tradition.
Perfect for holiday gatherings, bake sales, or satisfying that afternoon sweet tooth, these cookies stay fresh for days. The recipe scales easily too, so you can make a batch for sharing or freeze extras for later. Let's get baking—the results will impress even the most discerning cookie lovers.
Ingredients for best ever brown butter chocolate chip cookie
These premium ingredients transform ordinary cookies into restaurant-quality masterpieces—nutty, chewy, and irresistible.
| Ingredient | Amount | Notes |
|---|---|---|
| Unsalted Butter (High-Fat, European Style) 🧈 | 2 cups | Browned until nutty aroma |
| Granulated Sugar 🍚 | 1 ½ cups | Superfine preferred for smooth texture |
| Packed Brown Sugar 🍚 | ½ cup | Lightly packed for accurate measure |
| Large Eggs 🥚 | 2 whole | Room temperature for even mixing |
| Pure Vanilla Extract 🌿 | 2 tsp | High-quality, Madagascar bourbon preferred |
| All-Purpose Flour 🌾 | 3 ½ cups | Sifted for light, airy dough |
| Sea Salt 🧂 | 1 tsp | Fine grain, Diamond Crystal preferred |
| Baking Soda 🧪 | ½ tsp | Fresh for optimal leavening |
| Premium Semi-Sweet Chocolate Chips 🍫 | 2 ½ cups | Ghirardelli or Valrhona preferred |
| Flaky Sea Salt (for finishing) 🧂 | 2 tsp | Maldon or Jacobsen preferred |
The butter is non-negotiable—European-style, 82% fat minimum like Plugrá or Kerrygold gives the richest flavor. Brown it until golden with nutty aromas (about 6-8 minutes), then cool completely before mixing. Ghirardelli or Valrhona chocolate chips melt into velvety pools—skip the store brand. For vanilla, Madagascar bourbon extract adds depth over imitation. The flour? King Arthur or Gold Medal bakes consistently. Pro tip: Toast your chocolate chips for 2 minutes at 350°F before mixing—they'll caramelize beautifully during baking.
No brown butter? Regular butter plus 1 tsp brown sugar per cup mimics the flavor, though it won't have those golden flecks. Substituting chocolate? Enjoy Life brand for allergies, or chopped 70% dark chocolate for intensity. Short on vanilla? Seeds from 1 vanilla bean plus 1 tsp sugar works in a pinch. The sea salt is crucial—Diamond Crystal dissolves cleanly, while Maldon flakes add dramatic finishing touches. For gluten-free, swap flour for a 1:1 blend like Bob's Red Mill GF 1-to-1, but expect slightly denser cookies.
Butter and dough must chill 30 minutes minimum—this prevents spreading and deepens flavor. Store baked cookies in an airtight container with parchment between layers for 5-7 days. Freeze dough balls for 6 months or baked cookies for 3 months (wrap tightly). For maximum freshness, bake in batches of 12 cookies—hot pans lose heat fast. These cookies reheat beautifully: 10 seconds in the microwave restores that gooey center. Trust me, the wait is worth it for that perfect bite.
Why You'll Love This Recipe
- No-Fuss Mixing: I swear by the 10-minute mix-and-bake method—just cream butter and sugars, fold in eggs and vanilla, then dump in chocolate chips. The dough comes together faster than my coffee cools, and honestly, that’s the kind of recipe I can trust when I’m already late.
- Brown Butter Magic: That nutty, caramelized butter? It’s what turns these from good to obsession-worthy. The high-fat European butter melts into a rich, toasty flavor that makes every bite taste like a bakery secret—no fancy techniques, just patience and a saucepan.
- Crowd-Pleaser Anywhere: Pack a batch for potlucks, freeze half for lazy mornings, or serve them warm with ice cream when friends drop by. Between us, these cookies disappear at parties, and I’ve never met someone who didn’t ask for the recipe afterward.
- Leftovers That Last: They soften just right the second day, and if you’re like me, you’ll find a way to eat them all before then. But if you’re smart, you’ll stash them in the freezer—because reheating one straight from the bag is basically dessert therapy.
Step-by-step instructions for brown butter chocolate chip cookies
Here's how to create cookies with irresistible nutty depth and caramelized chocolate chunks.
Brown the Butter to Perfection
Melt the 2 cups unsalted butter (high-fat, European style) in a heavy-bottomed saucepan over medium heat. Watch closely as it foams and bubbles—this is when the magic begins. Let it cook until it turns a deep golden brown and releases a rich, nutty aroma, about 8-10 minutes. You'll see small browned bits forming at the bottom of the pan.
Immediately pour the browned butter into a heatproof bowl and let it cool for 5 minutes while you prepare the rest. Don't skip this cooling step—the butter needs to solidify slightly before mixing. If you rush, the butter will melt the sugars and create a gummy dough. The nutty, caramelized flavor from browning is what makes these cookies truly exceptional.
Cream the Butter and Sugars
Once the butter has cooled but is still slightly warm, return it to your stand mixer fitted with the paddle attachment. Add the 1.5 cups granulated sugar and 0.5 cup packed brown sugar. Beat on medium speed for 3-4 minutes until the mixture is light, fluffy, and nearly doubles in volume. You're looking for a pale, ribbony texture that leaves clean streaks on the sides of the bowl.
This creaming process incorporates air into the dough, which creates those beautiful crackly tops and helps the cookies spread just enough. If your butter is too cold, the mixture will take longer to cream properly. If it's too warm, the sugars will dissolve and you'll end up with dense cookies. Aim for that perfect balance where the butter is soft but not melted.
Add Eggs and Vanilla
Add the 2 whole large eggs, one at a time, mixing on low speed for 30 seconds after each addition. Then stir in the 2 teaspoons pure vanilla extract. The mixture should be smooth and slightly thickened. If it looks curdled, don't worry—it will come together when you add the dry ingredients.
This is where the vanilla's aromatic compounds really start to infuse into the dough. I always use Madagascar bourbon vanilla extract for its rich, complex flavor profile. The eggs provide structure and moisture, while the vanilla adds that signature cookie aroma. Make sure your eggs are at room temperature for even mixing and better texture.
Combine Dry Ingredients and Fold in Chocolate
In a separate bowl, whisk together the 3.5 cups all-purpose flour, 1 teaspoon sea salt, and 0.5 teaspoon baking soda. With the mixer on low speed, gradually add the dry ingredients to the wet mixture. Mix just until combined—you should still see some flour streaks. Overmixing develops gluten and makes cookies tough.
Remove the bowl from the mixer and gently fold in the 2.5 cups premium semi-sweet chocolate chips using a silicone spatula. Make sure they're evenly distributed throughout the dough. I like to use a mix of Ghirardelli and Valrhona chocolate chips for that extra depth of flavor. The chocolate should be cold so it maintains its shape during baking and creates those beautiful pockets of melted chocolate in the center.
Chill and Bake for Maximum Flavor
Cover the dough with plastic wrap and refrigerate for at least 1 hour (I prefer 2 hours or even overnight). Chilling solidifies the butter, which prevents excessive spreading in the oven. It also allows the flour to fully hydrate, creating better texture and more pronounced flavors.
Preheat your oven to 350°F and line two baking sheets with parchment paper. Scoop the chilled dough into 2-tablespoon portions (use a cookie scoop for uniform size) and place them 3 inches apart on the prepared sheets. Sprinkle each cookie with a pinch of flaky sea salt before baking.
Bake for 11-13 minutes until the edges are golden brown but the centers still look slightly underdone. They'll continue cooking on the hot pan after you remove them from the oven. Let them cool on the baking sheet for 5 minutes before transferring to a wire rack. The cookies should be soft in the center with crispy edges and pockets of melted chocolate.
Pro Tips For Making Best Ever Brown Butter Chocolate Chip Cookie
- STOP WHEN IT’S GOLDEN: Brown butter until it smells nutty and rich—not just toasted, but with visible flecks of foam settling at the bottom. I used to pull it too early, and the cookies lacked that deep, caramelized depth that makes them irresistible.
- CHILL THE DOUGH LONGER: Give the dough a minimum of 24 hours in the fridge, ideally 48—this isn’t optional. The gluten relaxes, the flavors meld, and the cookies spread just enough to get that perfect chewy edge. (Yes, even if you’re impatient like me.)
- WEIGH YOUR BROWN SUGAR: Pack that brown sugar firmly into the measuring cup—don’t scoop and level. Too much air means cookies that spread wildly and taste uneven. A kitchen scale takes seconds and guarantees consistency every time.
- SALT THE BUTTER FIRST: Add the pinch of salt (½ tsp) directly to the melted brown butter while it’s still hot. This dissolves completely, ensuring even flavor distribution—no more salty pockets or bland spots. (Your future self will notice the difference.)
Make-ahead tips for leftovers
Dough Prep Ahead
Make life easier by preparing the dough 24 hours in advance. After mixing, cover it tightly with plastic wrap and refrigerate. The flavors meld beautifully overnight, and the chilled dough is ready to scoop straight from the fridge.
I often make a double batch on Sundays so I have cookies ready for the week ahead. 📅
Freezing Dough Balls
For ultimate convenience, shape the dough into 2-tablespoon balls and freeze them on a parchment-lined tray for 1 hour to firm up. Transfer to a ziplock freezer bag with parchment between layers (to prevent sticking) and freeze for up to 6 months.
When ready to bake, let them thaw on the counter for 15-20 minutes before popping them in the oven. No need to chill again—they'll bake perfectly straight from frozen. ❄️
Baked Cookie Storage
Store freshly baked cookies in an airtight container with parchment paper between layers to maintain crispness. They stay fresh at room temperature for 5-7 days.
For longer storage, freeze baked cookies in a single layer on a tray for 1 hour, then transfer to a ziplock bag with parchment. Reheat in the oven at 300°F for 5 minutes to restore that gooey center. 💫
Batch Baking Tips
Bake in two batches of 12 cookies to avoid overcrowding the oven. Use the same baking sheet for both batches—hot pans help cookies spread slightly, creating that perfect texture. If baking from frozen, add 1-2 extra minutes to the bake time.
I like to label my baking sheets with the batch number and bake time to stay organized. 🔥
Make-Ahead for Parties
Plan ahead for gatherings by baking 3 days in advance and storing cookies in layers with parchment and wax paper between each. The cookies will soften slightly but still taste amazing.
For a restaurant-worthy presentation, arrange them on a platter with a dusting of flaky sea salt and a sprinkle of crushed pistachios. Serve with a glass of cold milk or a scoop of vanilla ice cream. 💛
Reviving Stale Cookies
No need to toss cookies that have lost their crispness! Wrap them tightly in aluminum foil and warm in a 350°F oven for 5-7 minutes. The heat will restore their texture while keeping the chocolate chips gooey.
This trick works especially well for cookies that have been stored for a week or more. 💡
Nutrition facts
Frequently asked questions
Why does browning the butter make such a difference?
The browning process creates complex caramelized flavors and golden flecks that add depth to every bite. These nutty aromas transform ordinary cookies into something extraordinary. Plus, the cooled browned butter solidifies better in the dough, preventing excessive spreading while baking.
Can I substitute regular butter for brown butter?
Yes! Mix 2 cups regular butter with 2 tablespoons brown sugar and 1 teaspoon vanilla extract to mimic the flavor. However, you'll miss the beautiful golden flecks and that rich, toasty aroma that makes brown butter special. For best results, always use high-fat European-style butter.
How do I prevent my cookies from spreading too much?
Chill the dough for at least 30 minutes (or up to 24 hours) to firm up the butter. Use a cookie scoop for uniform 2-tablespoon portions and place them 3 inches apart on the baking sheet. Bake at 350°F for 11-13 minutes—they'll spread slightly while cooking.
What's the best way to reheat stale cookies?
Wrap cookies in aluminum foil and warm at 350°F for 5-7 minutes to restore their crispness and melt the chocolate chips again. For extra flavor, sprinkle with a pinch of flaky sea salt before reheating. This works especially well for cookies stored for over a week.
Can I make these gluten-free?
Yes! Replace the all-purpose flour with a 1:1 gluten-free blend like Bob's Red Mill GF 1-to-1. Expect slightly denser cookies, but they'll still be delicious. For best results, use xanthan gum if your blend doesn't include it. The texture won't be identical, but the flavor will still shine.