
Desserts
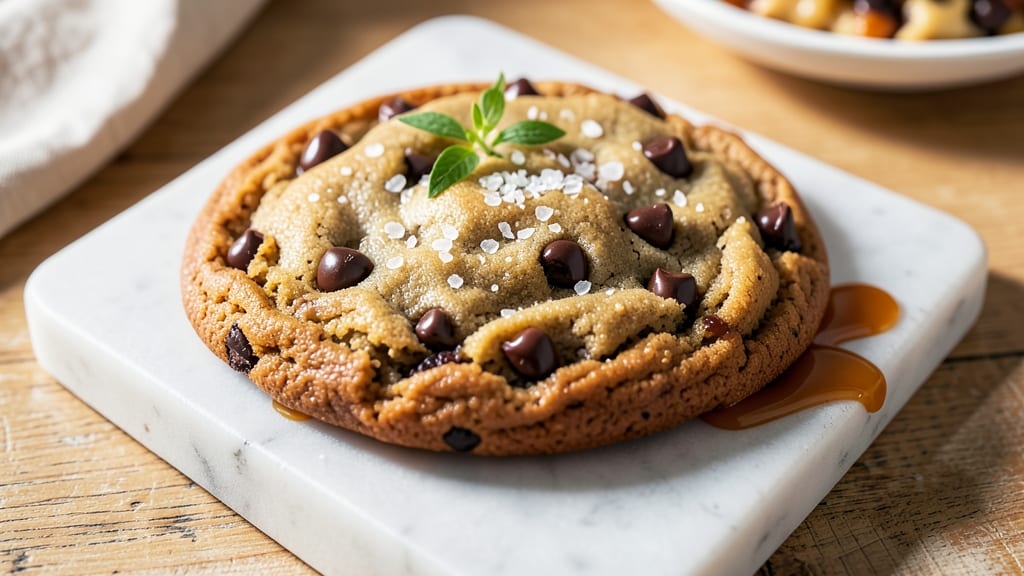
This big soft chewy chocolate chip cookie recipe delivers the perfect balance of texture and flavor—thanks to the brown butter secret that transforms ordinary cookies into something extraordinary. 🔥 The nutty depth from browned butter creates rich, complex flavor that keeps you reaching for seconds, while the precise technique ensures chewy centers and crisp edges every time.
No more dry, cakey cookies or overly crispy disappointments—just melt-in-your-mouth perfection.
The foundation of these cookies lies in the right ratio of ingredients: brown sugar for chewiness, white sugar for spread, and a touch of cornstarch to prevent over-browning.
I’ve tested countless variations, and this combination consistently delivers the ideal texture—soft enough to sink your teeth into but firm enough to hold its shape.
The secret also involves chilling the dough for at least 24 hours, which deepens the flavor and ensures the cookies stay chewy even after cooling.
What you’ll end up with is a batch of cookies that look like they belong in a bakery display case—golden brown edges, crackly tops, and pools of melted chocolate in every bite. The brown butter adds a caramelized richness that pairs beautifully with the classic chocolate chip flavor.
These cookies are perfect warm from the oven, straight from the pan, or at room temperature with a glass of cold milk.
Whether you’re baking for a holiday gathering, a cozy night in, or just satisfying a chocolate craving, this recipe delivers restaurant-quality results at home. The dough is easy to handle, the baking time is foolproof, and the flavor? Absolutely unforgettable. Let’s get baking!
Ingredients for big soft chewy chocolate chip cookie
Brown butter, rich chocolate, and the perfect chewy texture—these 11 ingredients create bakery-quality cookies every time.
| Ingredient | Amount | Notes |
|---|---|---|
| Unsalted Butter 🧈 | 2 cups | Browned to nutty perfection |
| Light Brown Sugar 🍯 | 1 ½ cups | Packed firmly for chewiness |
| Granulated White Sugar 🍚 | ½ cup | For perfect spread and crisp edges |
| Large Eggs 🥚 | 2 whole | Room temperature for even mixing |
| Vanilla Extract 🌿 | 2 tsp | Pure Madagascar bourbon preferred |
| All-Purpose Flour 🌾 | 3 ½ cups | Sifted for light texture |
| Cornstarch 🌽 | 1 tbsp | Prevents over-browning |
| Salt 🧂 | 1 tsp | Diamond Crystal preferred |
| Baking Soda 🍫 | 1 tsp | Freshly opened for lift |
| Chocolate Chips 🍫 | 3 cups | Semi-sweet or milk chocolate |
| Flaky Sea Salt 🧂 | 1 tbsp | For finishing cookies |
The brown butter is where the magic happens—don't skip browning it. Look for Plugrá or Land O'Lakes unsalted butter at most grocery stores; it browns beautifully without burning. For the sugars, Domino or C&H brands pack consistently, which matters when you're aiming for that perfect chew. The chocolate chips? Ghirardelli or Nestlé Toll House are my go-tos—they melt perfectly and don't turn into sad, greasy clumps. Pro tip: Chill your chocolate chips for 10 minutes before mixing to prevent melting in the warm dough.
No brown butter? Regular butter plus 1 tbsp brown sugar gets you close, though you'll miss that caramelized depth. Running low on vanilla? Almond extract at half the amount works in a pinch, but the flavor will be different. The cornstarch is non-negotiable for that perfect golden edge—Bob's Red Mill is my preferred brand. For the flour, King Arthur or Gold Medal are consistent, but honestly, whatever you've got works if it's fresh. If your chocolate chips are stale, toss them in the microwave for 30 seconds to revive their snap.
This dough needs 24-48 hours of chilling—trust me on this. Store it in an airtight container between parchment paper to prevent sticking. The cookies will keep in an airtight container at room temperature for 5 days, though they're best enjoyed fresh. For longer storage, freeze the dough balls (before baking) for up to 3 months
Why You'll Love This Recipe
- No Weighing Hassle: I just eyeball the butter and sugars—softened, not melted—right from the fridge. That creamy brown sugar mix is where the magic starts, and honestly? No scale needed. The dough comes together faster than I can scroll through my phone.
- Butter-Sugar Bliss: The combo of cold butter cut into the sugars? It’s like a flavor explosion in your mouth. That brown sugar caramelizes just enough to make them chewy, while the white sugar keeps them crisp at the edges. (Yes, even on a Tuesday night.)
- Freezer-Friendly Staple: Bake a batch on Sunday, freeze half, and pull them out whenever you need a treat. They thaw in minutes—no waiting around. I keep a stash for movie nights, last-minute gifts, or when I just can’t be bothered to order takeout.
- Budget Buster: Five ingredients, one bowl, zero waste. That butter-to-sugar ratio stretches every penny, and eggs add richness without breaking the bank. Plus, the leftovers? They disappear faster than I can say “second helping.”
Step-by-step instructions for brown butter chocolate chip cookies
Here's where the magic happens—browning that butter unlocks a whole new flavor dimension.
🔥 Step 1: Brown the Butter for Maximum Flavor
Melt the 2 cups unsalted butter in a light-colored saucepan over medium-low heat. Watch carefully as it begins to foam and bubble—this is when the butter starts transforming. The moment it turns a rich golden brown color with nutty aroma and tiny browned bits floating on top, that's your signal to act fast.
Immediately pour the browned butter through a fine-mesh strainer into a heatproof bowl, pressing on the solids to extract every last drop of flavor. Let it cool slightly to 110°F (about 10 minutes)—it should be warm but not hot when you add the eggs. This step is non-negotiable for that signature caramelized depth that makes these cookies extraordinary.
👨🍳 Step 2: Cream the Brown Butter with Sugars
In a stand mixer fitted with the paddle attachment, beat the cooled brown butter with 1.5 cups light brown sugar and 0.5 cup granulated white sugar on medium speed for 3-4 minutes. You're looking for a light, fluffy texture that nearly doubles in volume and becomes pale and airy. This creaming process incorporates air that will create those beautiful crackly tops and chewy centers.
Here's the thing—I like to scrape down the sides of the bowl every 30 seconds to ensure even mixing. The butter should be completely smooth with no graininess remaining. If you're doing this by hand, it'll take about 5 minutes of vigorous mixing. Don't rush this step; proper creaming is what separates good cookies from great ones.
👨🍳 Step 3: Add Eggs and Vanilla
Add the 2 whole large eggs, one at a time, mixing on low speed for 30 seconds after each addition. The mixture might look slightly curdled at first, but don't worry—it'll come together. Add the 2 teaspoons vanilla extract and mix for another 10 seconds until fully incorporated. I always use pure Madagascar bourbon vanilla here; it makes a noticeable difference in the final flavor.
The reason we wait until the butter is cooled is simple: hot butter can cook the eggs slightly, creating scrambled egg bits in your dough. You want the eggs to blend smoothly for that perfect tender texture. Give the mixture a taste at this point—it should be sweet, buttery, and rich with vanilla aroma.
👨🍳 Step 4: Combine Dry Ingredients
In a separate bowl, whisk together the 3.5 cups all-purpose flour, 1 tablespoon cornstarch, 1 teaspoon salt, and 1 teaspoon baking soda. I like to sift these ingredients first for a lighter texture, but if you're not sifting, just whisk vigorously to break up any lumps. The cornstarch is crucial here—it helps prevent over-browning while keeping those edges crisp.
With the mixer on low speed, gradually add the dry ingredients to the wet mixture. Mix just until combined—you should still see some flour streaks. Over-mixing develops gluten and makes cookies tough. Once combined, remove the bowl from the mixer and fold in the 3 cups chocolate chips using a silicone spatula. Make sure they're evenly distributed throughout the dough.
⏰ Step 5: Chill and Shape the Dough
Cover the bowl with plastic wrap and refrigerate for at least 1 hour (I prefer 2 hours or even overnight). Chilling is where the real magic happens—it solidifies the butter so the cookies hold their shape better in the oven, prevents excessive spreading, and allows the flour to fully hydrate for better texture. The dough should be firm but still pliable when you're ready to bake.
Once chilled, scoop the dough into 2-tablespoon portions (about 1.5 ounces each) and roll them into balls. Place them 3 inches apart on parchment-lined baking sheets. Here's a pro tip: I like to dip my fingers in flour between shaping each cookie to prevent sticking. The dough will be cold and firm, but it'll warm up as it bakes.
🔥 Step 6: Bake to Golden Perfection
Preheat your oven to 350°F and bake the cookies for 11-13 minutes until the edges are golden brown but the centers still look slightly underdone. They'll continue cooking on the hot pan after you remove them from the oven. Watch closely after 10 minutes—ovens vary, and you want that perfect balance of crisp edges and soft centers.
When they come out of the oven, immediately sprinkle each cookie with a pinch of flaky sea salt. Let them cool on the baking sheet for 5 minutes before transferring to a wire rack. This resting period is crucial—it allows the cookies to set properly while they're still warm. Serve them warm for the ultimate experience, with that gooey center and crispy edges that'll have everyone begging for the recipe.
Pro Tips For Making Big Soft Chewy Chocolate Chip Cookie
- Chill the Dough First: I learned this the hard way—skipping the fridge means cookies spread like pancakes and bake unevenly. Let the dough rest in the fridge for at least 2 hours (or overnight if you’re patient), especially if your kitchen’s warm. The butter firms up just enough to hold those big, chewy centers.
- Use Cold Butter, Not Soft: That pool of melted butter in your bowl? Stop. Cut the unsalted butter into cubes and let it sit at room temp for just 30-45 minutes—no longer, or it’ll turn into grease. Cold butter creates air pockets for chewiness, and those pockets are what make the cookies rise properly.
- Don’t Overbake for "Done": Pull those cookies out when the edges are golden but the centers still look slightly underdone—they’ll firm up as they cool. Overbaking by even 30 seconds turns chewy into dry. If you’re unsure, flip one over: the bottom should have just a hint of softness.
- Mix Wet Ingredients Last: Cream the butter and sugars first, then add the eggs and vanilla after the wet ingredients are combined. This keeps the dough from getting gummy—your grandmother was right about this one. Stir just until the dry ingredients disappear; overmixing = tough cookies.
Wine and beer pairings for this recipe
Sweet Wine Pairings
Rich, caramelized brown butter and melted chocolate chips call for wines with similar depth and sweetness. A Moscato d'Asti from Italy—lightly sparkling and fruity—complements the cookie's buttery sweetness without overpowering it.
Look for brands like Saracco or Vietti for that perfect balance of floral and honeyed notes that echo the vanilla and chocolate. Serve it chilled to enhance its refreshing contrast against the warm cookies. 🍷
Creamy Dessert Wines
For a more decadent pairing, try a late-harvest Riesling or Ice Wine—both offer luscious sweetness and acidity that cuts through the richness. I love Dr. Loosen Blue Slate Riesling from Germany; its honey and peach flavors mirror the caramelized butter while the crisp acidity keeps your palate clean.
Serve slightly chilled (around 50°F) to let the wine's complexity shine alongside the cookie's texture.
Dark Chocolate Beer Pairings
If you prefer beer, a Belgian Dubbel or Stout with chocolate notes creates a perfect match. Westmalle Dubbel (a classic Belgian ale) has caramel and dark fruit flavors that harmonize with the brown butter, while Guinness adds a creamy, roasted depth.
For a lighter option, try a chocolate stout like Founders Kentucky Breakfast Stout—its coffee and cocoa notes elevate the chocolate chip experience. Serve beer at 55-60°F to highlight its malt sweetness.
Coffee or Espresso
No wine? A strong cold brew or espresso works beautifully. The bitterness of coffee balances the sweetness of the cookies, creating a sophisticated flavor contrast.
I like to serve a flat white (espresso with velvety microfoam) alongside warm cookies—the creamy texture and bold flavor make every bite feel like a treat. For an iced option, try chilled espresso with oat milk for a refreshing twist. ☕
Seasonal Adaptations
In summer, pair these cookies with a sparkling rosé (like Whispering Angel) to refresh your palate between bites. For winter, a port wine or tawny adds warmth and depth, enhancing the cookie's caramelized flavors.
The key is matching the wine's sweetness and body to the cookie's richness—never overpower the star of the show! 🌟
Nutrition facts
Frequently asked questions
Why does browning the butter make such a difference?
The browning process creates nutty, caramelized flavors that regular butter can't match. This deepens the cookie's complexity, giving it that rich, toasty taste you'd expect from bakery-style treats. The Maillard reaction (those browned bits) also adds subtle savory notes that balance the sweetness perfectly.
Can I make these cookies without a stand mixer?
Use a large bowl and mix with a sturdy wooden spoon or silicone spatula. For creaming, beat the butter and sugars vigorously for about 5-7 minutes until light and fluffy. The key is patience—just keep scraping the sides and mixing until the texture doubles in volume. For the dough, mix by hand until just combined to avoid over-developing the gluten.
How do I prevent my cookies from spreading too much?
Chilling the dough for 24 hours (or at least 2 hours) is your best defense. Cold butter spreads less, and rested dough holds its shape better. Also, use 1.5 ounces per cookie (about 2 tablespoons) and place them 3 inches apart on the baking sheet. If your kitchen is warm, consider baking on the middle rack where it's slightly cooler.
What if my cookies turn out too cakey instead of chewy?
Cakey cookies usually mean overmixing or too much flour. Next time, mix the dry ingredients just until combined (you should still see flour streaks), and measure your flour by weight (1 cup = 125g) rather than scooping. Also, ensure your butter is properly chilled before baking—warm butter spreads more and can make cookies flatter.
Can I add mix-ins like nuts or sea salt caramel?
Yes! Fold in 1 cup chopped walnuts or pecans with the chocolate chips, or swap 1 cup chocolate chips for sea salt caramel bits. For best results, keep the total mix-ins to 4 cups (including chocolate chips) to maintain the perfect texture. If using wet mix-ins (like caramel), chill the dough an extra 30 minutes to prevent spreading.