
Desserts
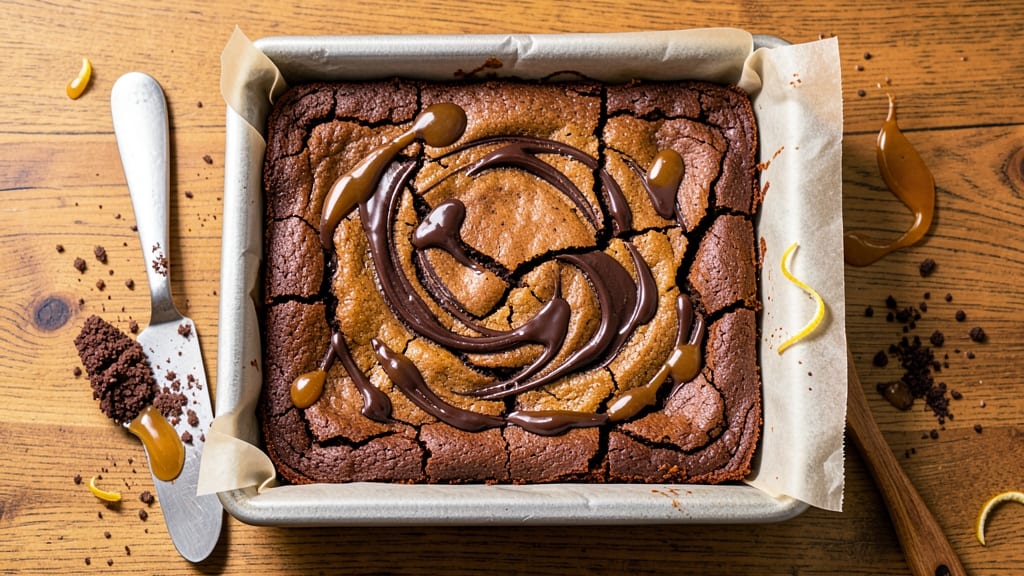
This bittersweet chocolate brownie recipe delivers the perfect balance of fudgy texture and deep, complex flavor that chocolate lovers crave. After testing countless variations, I've perfected a method that creates those coveted deep cracks on top while keeping the centers rich and melty.
The secret lies in precise ingredient ratios and careful baking—no guesswork, just guaranteed results every time.
The foundation of these brownies is high-quality bittersweet chocolate (70% cacao or higher) combined with just the right amount of butter and sugar to create a dense, moist crumb. I use a simple one-bowl method that minimizes cleanup while delivering professional-quality results.
The recipe includes optional mix-ins like toasted walnuts or flaky sea salt, but the base recipe stands strong on its own.
What you'll end up with are brownies that are fudgy enough to satisfy your sweet tooth but not so dense they're difficult to cut. The deep cracks on top indicate perfect doneness, while the interior remains moist and rich with pockets of melted chocolate.
These brownies are ideal for serving warm with a scoop of vanilla ice cream or chilled with a dollop of whipped cream.
Whether you're baking for a special occasion or just treating yourself, this recipe delivers restaurant-quality brownies in your own kitchen. The instructions are straightforward, and the ingredients are simple—just quality chocolate and a few pantry staples. Let's get baking!
Ingredients for bittersweet chocolate brownie
Quality chocolate and simple pantry staples create these rich, crack-topped brownies.
| Ingredient | Amount | Notes |
|---|---|---|
| Bittersweet Chocolate (70% cacao or higher) 🍫 | 8 oz | High-quality chocolate bars chopped |
| Unsalted Butter 🧈 | 1 cup | Cold, cubed for even melting |
| Granulated Sugar 🍚 | 1 ½ cups | White or light brown preferred |
| Large Eggs 🥚 | 2 whole | Room temperature for best mixing |
| All-Purpose Flour 🌾 | ½ cup | Sifted for smooth batter |
| Vanilla Extract 🌿 | 1 tsp | Pure vanilla for authentic flavor |
| Salt 🧂 | ½ tsp | Fine sea salt preferred |
| Toasted Walnuts (optional) 🌰 | ½ cup | Chopped, lightly toasted |
| Flaky Sea Salt (optional) 🧂 | 1 tsp | For garnish, like Maldon |
The chocolate makes all the difference here. Ghirardelli or Valrhona are my go-tos for that deep, complex flavor, but any 70% cacao or higher will work. Break it into small pieces before melting for even distribution. If your chocolate has nuts or chips, pick through them—those should go in the mix-ins, not the base. Butter should be cold when you measure it; let it sit out just until it yields to pressure but doesn't melt. Costco or Whole Foods often have great bulk chocolate options at reasonable prices, but don't skimp on quality here.
No walnuts? Pecans or macadamias work just as well—just toast them first. Short on vanilla? Vanilla bean paste adds little flecks of flavor magic. The flour needs to be sifted to avoid lumps, but if you're in a rush, just whisk it vigorously in the bowl. For extra richness, swap half the sugar for dark brown sugar. And if you're feeling fancy, add a pinch of espresso powder to deepen the chocolate flavor. The sea salt is optional but transforms these into something truly special—Maldon or Jacobsen flakes are perfect for this.
Brownies are best served at room temperature, so let them cool completely before slicing. Store in an airtight container at room temperature for 3-4 days or refrigerate for up to 1 week. For longer storage, freeze portions wrapped tightly in plastic for 3 months. These reheat beautifully—just pop a slice in the oven at 350°F for 2-3 minutes to restore that melty center. Double the recipe? It bakes longer but worth it for a crowd.
Why You'll Love This Recipe
- No-Fuss Mix-In: I swear by this recipe because it’s the kind of thing you can measure, fold, and bake without stress. No tempering chocolate, no complicated folding—just melt butter, chop chocolate (or use chips), and let the eggs and sugar do their magic. Honestly, I’ve made it in my dorm microwave and a restaurant kitchen, and it still comes out rich.
- Rich Without Overpowering: That 70%+ bittersweet chocolate? It’s the star, but the butter and sugar keep it balanced—deep, not bitter, with a fudgy center that melts in your mouth. Between us, my picky-eater cousin actually asks for seconds, and he’s the guy who turns up his nose at dark chocolate.
- Weeknight or Dessert Party: Need something quick for a last-minute dinner guest? These brownies are ready in under an hour. Or, freeze half the batch for a future craving—trust me, they’re just as good reheated. I’ve even sliced them thin for a fancy charcuterie board (yes, really).
- Budget-Friendly Luxury: You’re using high-quality chocolate, but the rest of the ingredients are pantry staples. A single bar of bittersweet chocolate and a stick of butter stretch across multiple batches, and the flour? You probably have it. It’s the kind of treat that feels indulgent without breaking the bank.
Step-by-step instructions for bittersweet chocolate brownies
Here's the method for achieving those coveted deep fudgy cracks and melty centers every time.
Melt Chocolate and Butter Together
Line an 8x8-inch baking pan with parchment paper, leaving an overhang for easy removal. In a medium heatproof bowl set over a pot of simmering water, combine the 8 oz bittersweet chocolate and 1 cup unsalted butter. Stir occasionally until both are completely melted and smooth, about 5-7 minutes. The mixture should reach 110°F and look glossy with no streaks of white.
Remove the bowl from heat and let it cool slightly for 5 minutes. This step is crucial—if the mixture is too hot when you add the eggs, they'll scramble instead of emulsify properly. I like to test the temperature by touching the back of my hand to the bowl; it should feel warm but not hot enough to cause discomfort.
Whisk in Sugar and Eggs
While the chocolate mixture cools, sift the 0.5 cup all-purpose flour and 0.5 tsp salt together in a separate bowl. This prevents lumps and ensures even distribution. Once the chocolate reaches 100°F, whisk in the 1.5 cups granulated sugar until fully dissolved and smooth.
Add the 2 whole eggs, one at a time, whisking vigorously after each addition until fully incorporated. The batter should thicken noticeably as the eggs emulsify with the chocolate. Add the 1 tsp vanilla extract and mix until combined. Finally, fold in the flour mixture using a spatula until just combined—be careful not to overmix, which can develop gluten and make the brownies tough.
Fold in Walnuts (If Using)
If using, gently fold in the 0.5 cup toasted walnuts with a rubber spatula, reserving a few for garnish. The walnuts should be evenly distributed but not overmixed. Real talk: don't skip the toasting step—raw walnuts have a bitter taste that can overpower the delicate chocolate flavor.
Transfer the batter to the prepared baking pan and spread it evenly using an offset spatula. Tap the pan gently on the counter 2-3 times to remove any air bubbles. The batter should fill the pan about halfway—this ensures the perfect fudgy texture with those coveted cracks.
Bake to Perfect Doneness
Preheat your oven to 350°F. Bake the brownies for 25-30 minutes, or until a toothpick inserted in the center comes out with moist crumbs but no wet batter. The edges should be set, but the center should still look slightly underbaked—this is where the magic happens as they cool.
I know it seems counterintuitive, but the brownies will continue cooking as they cool. Don't overbake; the center should have a slight give when pressed. If you're unsure, err on the side of underbaking—they'll firm up as they cool.
Cool and Finish
Remove the brownies from the oven and let them cool completely in the pan for at least 1 hour. This resting period is crucial for developing that perfect fudgy texture. Once cooled, use the parchment overhang to lift the brownies out of the pan and cut into squares.
If using, sprinkle the tops with the reserved walnuts and 1 tsp flaky sea salt. The salt enhances the chocolate flavor and adds a delightful contrast. Store in an airtight container at room temperature for up to 5 days, though I doubt they'll last that long.
Pro Tips For Making Bittersweet Chocolate Brownie
- Melt Butter Slowly: I learned this the hard way—dumping cold butter into hot chocolate leads to weird lumps that never fully incorporate. Instead, melt the butter first, then pour it just off-boil into the chopped chocolate. The heat difference keeps things smooth, and you’ll avoid that grainy texture that ruins everything.
- Chop Chocolate Coarse: Skip the food processor unless you want dense, cakey brownies. Roughly chop the bittersweet chocolate into ½-inch chunks—big enough to see but small enough to melt evenly. This ensures pockets of rich, gooey chocolate throughout, not just a uniform slab.
- Skip Overmixing Eggs: Whisk the eggs until just combined—no streaks, no bubbles, no overdoing it. I used to beat them like I was making meringue, and the brownies turned out tough and dry. A few gentle swirls with a fork is all you need.
- Test Doneness with a Toothpick: Pull the pan after 25 minutes and check for fudgy perfection: the toothpick should come out with moist crumbs, not wet batter. If it’s clean, leave it in 5 more minutes—underbaked brownies taste like cake, and no one wants that.
Creative variations of these flavors
Nutty Twist Variations
Swap the walnuts for pecans or macadamias—both toast beautifully and add a buttery richness. For extra decadence, fold in ½ cup chopped candied pecans (from the baking aisle) right before baking. If you love texture contrast, try toasted hazelnuts with a pinch of cinnamon for warmth. 🌰
Spiced Chocolate Depth
Boost the chocolate flavor by adding ½ tsp ground cinnamon or ¼ tsp espresso powder to the dry ingredients. For a Mexican-inspired twist, include ½ tsp chili powder and top with a sprinkle of Tajín before serving.
Orange zest (from 1 tsp dried or 1 tbsp fresh) brightens the bitterness beautifully.
Cookie Dough Swirl
Create a marbled effect by folding ¼ cup chocolate chip cookie dough into the batter before spreading. Use a knife to gently swirl it through—this adds pockets of gooey cookie flavor. For a grown-up version, mix in 2 tbsp Nutella or melted salted caramel sauce. 🍪
Sea Salt & Caramel Topping
After baking, drizzle warm brownies with ¼ cup salted caramel sauce and sprinkle with flaky Maldon salt. For a smoky touch, add ¼ tsp smoked paprika to the batter. This combo elevates the chocolate flavor to next-level restaurant quality.
Espresso & Coffee Lovers
Add 1 tbsp instant espresso powder to the dry ingredients for an intense coffee-chocolate flavor. For an extra kick, fold in 1 tbsp cold brew concentrate with the eggs. This works especially well with dark chocolate (85% cacao or higher) for a sophisticated depth.
White Chocolate Swirl
Melt 4 oz white chocolate separately and swirl it through the batter using a knife. The contrast between dark and white chocolate creates stunning marbling. For extra indulgence, fold in ¼ cup white chocolate chips along with the walnuts. 🍫
Nutrition facts
Frequently asked questions
Why do your bittersweet brownies have deep cracks?
Those signature cracks happen when the brownies cool and contract after baking! The high fat content (from butter and chocolate) creates a dense, moist center that resists cracking, while the surface dries slightly to form those beautiful patterns. Pro tip: Don't overbake—pull them when the center still has a slight give.
Can I make these brownies without eggs?
Yes! For a vegan version, replace the 2 eggs with 2 tbsp ground flaxseed + 6 tbsp water (let it sit for 5 minutes to gel) or ¼ cup unsweetened applesauce. The texture will be slightly denser but still delicious. Just be sure to reduce baking time by 2-3 minutes since egg-free batters can dry out faster.
How do I know when they're perfectly fudgy?
Look for these signs: the edges should be set but not browned, and a toothpick should come out with moist crumbs—not wet batter. The center should still jiggle slightly when the pan moves. If you're unsure, underbake slightly—they'll firm up beautifully as they cool. Fudgy brownies should be dense enough to hold their shape but still tender.
Can I use milk chocolate instead of bittersweet?
Technically yes, but the flavor will be much sweeter and less complex. For best results, stick with 70% cacao or higher bittersweet chocolate. If you must use milk chocolate, reduce the sugar by ¼ cup and add ½ tsp espresso powder to balance the sweetness. The texture will still be good, but the depth of flavor won't be the same.
Why did my brownies turn out cakey instead of fudgy?
Cakey brownies usually happen from overbaking, too much flour, or not enough fat. Check your baking time—pull them when the center still looks slightly underdone. Also verify you used the correct ratio of ½ cup flour to 1.5 cups sugar. For extra fudginess, add 1-2 tbsp extra butter to the melted chocolate mixture next time.