
Desserts
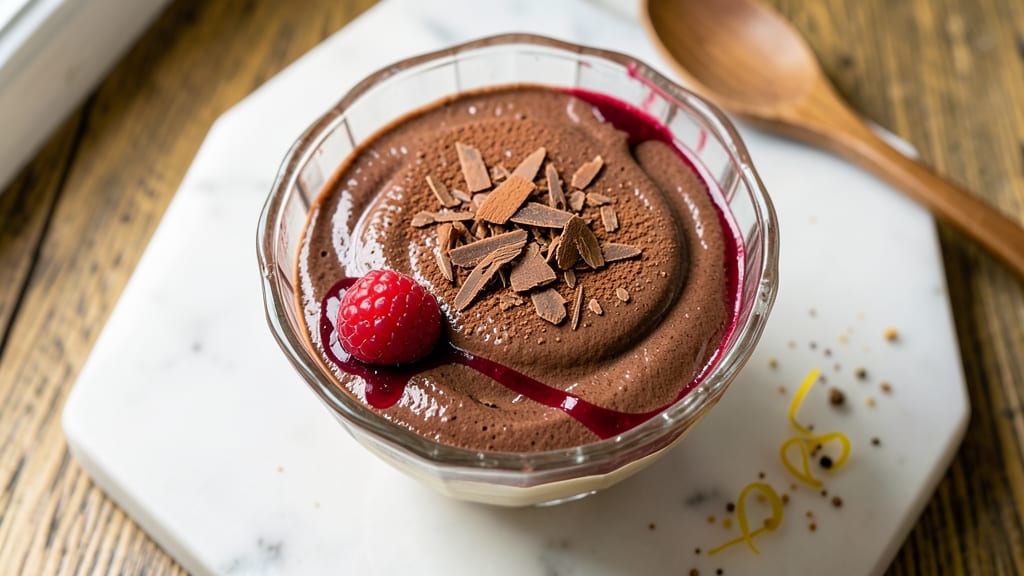
This bittersweet chocolate mousse recipe delivers the perfect balance of richness and elegance with silky swirls that melt in your mouth. The secret lies in tempering quality chocolate and folding it gently into whipped egg whites for that signature airy texture.
I've perfected this technique over years of testing, ensuring every spoonful is both luxurious and approachable.
The foundation begins with high-quality bittersweet chocolate—at least 60% cocoa—for deep flavor without bitterness. We combine it with egg yolks and cream, then whip egg whites to stiff peaks before folding everything together. This method creates mousse that's light yet dense, with a velvety finish that's impossible to resist.
What sets this recipe apart is the attention to detail: precise temperatures for melting chocolate, gradual folding to maintain airiness, and optional additions like espresso powder or orange zest for depth.
The result is a dessert that feels indulgent yet balanced—rich enough to satisfy chocolate lovers but not so heavy it leaves you sluggish.
Serve chilled with fresh berries, a dusting of cocoa powder, or a sprinkle of flaky sea salt to enhance the flavors. This mousse is perfect for special occasions or a decadent weekend treat that impresses without requiring advanced skills. Let's get started on creating your own perfect batch.
Ingredients for bittersweet chocolate mousse
Silky swirls begin with these luxurious ingredients—each chosen for perfect balance and velvety texture.
| Ingredient | Amount | Notes |
|---|---|---|
| Bittersweet Chocolate (60% cocoa or higher) 🍫 | 8 oz | High-quality, finely chopped |
| Large Eggs 🥚 | 4 whole | Room temperature preferred |
| Heavy Cream 🥛 | 1 ½ cups | Cold, 35% fat minimum |
| Granulated Sugar 🍚 | ¼ cup | Fine grain preferred |
| Unsalted Butter 🧈 | 2 tbsp | For melting chocolate |
| Vanilla Extract 🌿 | 1 tsp | Pure Madagascar preferred |
| Pinch of Salt 🧂 | ¼ tsp | Kosher or fine sea salt |
| Espresso Powder (optional) ☕ | ½ tsp | For depth of flavor |
| Orange Zest (optional) 🍊 | 1 tsp | Freshly grated preferred |
| Cocoa Powder (for garnish) 🍫 | 2 tbsp | Natural, unsweetened |
| Flaky Sea Salt (for garnish) 🧂 | 1 tsp | Maldon preferred |
The chocolate is non-negotiable—Valrhona or Callebaut are my go-tos, but any high-quality 60%+ cocoa works. Ghirardelli squares are a budget-friendly alternative if you're in a pinch. Store chocolate in a cool, dark place (not the fridge) to prevent condensation. Eggs should be room temperature—cold yolks won't emulsify properly. For the cream, 35% fat minimum is essential; lighter whipping cream won't hold its shape. I always buy mine from Whole Foods or Trader Joe's—their organic options are worth the splurge.
No vanilla extract? Seeds from a vanilla bean are a luxurious swap, or almond extract at half the amount works in a bind. Short on espresso powder? Instant coffee granules at the same quantity add depth. For the orange zest, organic is best—conventional zest can taste bitter. If you're avoiding dairy entirely, coconut cream can replace heavy cream, though the texture will be slightly denser. The butter should be unsalted—adding salt here would overpower the delicate balance. For a vegan version, aquafaba (chickpea brine) can replace egg whites when whipped to stiff peaks.
Chocolate stays fresh for 1 year in its original packaging, but once opened, keep it sealed in an airtight container for 6 months. Whipped egg whites lose stability after 30 minutes, so fold them in just before serving. The finished mousse keeps 3 days in the fridge, but the texture improves after 4-6 hours of chilling. For make-ahead convenience, prepare the base (melted chocolate mixture) up to 2 days ahead and store in the fridge—whip the egg whites fresh when ready to serve. Garnishes like cocoa powder and sea salt should be stored in cool, dark places to preserve their flavors.
Why You'll Love This Recipe
- No Whisk Arm Needed: I swear by this method—just melt the chocolate, whip the eggs and cream separately, then fold. No standing over a bowl for 10 minutes like some recipes demand. The eggs stay light and airy with minimal effort, and honestly? That’s my kind of magic.
- Deep, Decadent Crunch: The bittersweet chocolate here isn’t just dark—it’s rich, with that perfect balance of cocoa and just enough sweetness to make you pause. A tiny pat of butter at the end? That’s what turns "good" into "I’d drive across town for this" every time.
- Date Night or Dessert Afternoon: Serve it chilled in glasses for a fancy dinner, or let it sit at room temp for 10 minutes when you’re craving something quick. Between us, I’ve had it as a midnight snack straight from the fridge—no judgment. Works for celebrations or when you just need a break.
- Leftovers That Don’t Suffer: Most mousses turn grainy or sad overnight, but this one? Stays creamy for days if you store it right. I’ve reheated portions in the microwave (30 seconds, low power) and it’s like it was just made. Budget win: a single batch feeds two for dessert, or one for a whole week’s "emergency treats."
Step-by-step instructions for bittersweet chocolate mousse
This method delivers restaurant-quality mousse every time—silky, perfectly balanced, and rich without being heavy.
Melt the Chocolate and Butter for a Smooth Base
Place the 8 oz bittersweet chocolate and 2 tbsp unsalted butter in a heatproof bowl set over a saucepan of simmering water. Keep the heat at a gentle simmer—you want to melt the chocolate gradually to avoid seizing. Stir occasionally until the chocolate and butter are completely melted and the mixture is smooth, about 5-7 minutes. Remove from heat and let cool slightly, but not completely—it should still feel warm to the touch.
Here's the thing—if you let it cool too much, the eggs will scramble when you combine them. The ideal temperature is warm enough to blend smoothly but cool enough to temper the eggs. You'll know it's ready when the mixture looks glossy and reaches about 110°F on a candy thermometer. If you don't have one, just test it by dipping your finger in—it should feel warm but not hot.
Whisk Eggs and Sugar to Ribbon Stage
In a separate bowl, whisk together the 4 whole large eggs and 0.25 cup granulated sugar over a double boiler or in a bowl set over simmering water until the mixture reaches 160°F on a candy thermometer. This process, called tempering, ensures the eggs cook gently and create a stable mousse. You'll see the mixture thicken and pale slightly—this is called the "ribbon stage" when you can lift the whisk and see clear ribbons form in the batter.
I always do this step over a double boiler because direct heat can scramble the eggs. If you don't have one, just use a heatproof bowl over simmering water, stirring constantly. The mixture should take about 8-10 minutes to reach the right temperature. Don't rush this—properly tempered eggs make all the difference in texture. Once it reaches temperature, remove from heat immediately and let cool to room temperature while you whip the cream.
Whip the Cream to Stiff Peaks
In a separate, chilled bowl, whip the 1.5 cups heavy cream to stiff peaks using a stand mixer or hand mixer. This means the cream should hold its shape when you lift the beaters—it should be thick enough to leave a trail when you pull the beaters out. Chill your bowl and beaters beforehand for best results. You'll know it's ready when the cream forms soft peaks that almost hold their shape but still flatten slightly at the tips.
Here's my pro tip: don't over-whip or you'll get butter. I usually whip the cream until it's just at the stiff peak stage—about 3-4 minutes with a stand mixer. If you're unsure, test it by lifting the beaters—if the cream holds a peak that stands straight up for a few seconds before collapsing, it's perfect. Add the 1 tsp vanilla extract, 0.25 tsp pinch of salt, and 0.5 tsp espresso powder (if using) now and mix gently to combine.
Fold Everything Together Gently
First, gently fold about ⅓ of the whipped cream into the egg mixture to lighten it. Then, slowly fold in the melted chocolate mixture in three additions, alternating with more of the whipped cream. This step is crucial—folding gently prevents deflating the cream. Use a spatula and work in a figure-eight motion to maintain air incorporation. The mixture should be thick but still pourable. If you're using 1 tsp orange zest, fold it in now along with the remaining whipped cream.
Real talk: this is where many people rush and end up with a dense mousse. I always take my time here, making sure each addition is fully incorporated before adding more. The goal is to create a smooth, velvety texture that's light yet rich. Once fully combined, transfer the mousse to serving glasses and smooth the tops with a spatula. Chill for at least 4 hours (overnight is best) to let the flavors meld and the texture set properly.
Garnish and Serve for Maximum Impact
Before serving, dust the tops with 2 tbsp cocoa powder and sprinkle with 1 tsp flaky sea salt. The salt enhances the chocolate flavor and adds a sophisticated finish. I like to use a fine-mesh sieve for the cocoa powder to create an even, elegant dusting. Serve immediately after removing from the refrigerator so the mousse is perfectly chilled but still creamy.
Each spoonful should deliver that perfect balance of rich, bittersweet chocolate with a velvety texture that melts on your tongue. The espresso powder adds depth, while the orange zest (if used) brings a bright, citrusy contrast. This isn't just dessert—it's a decadent experience that proves you don't need fancy equipment to create something extraordinary.
Pro Tips For Making Bittersweet Chocolate Mousse
- Temper the Eggs First: After melting the chocolate and butter together, let that mixture cool to just above body temperature—around 100°F (38°C)—before adding the egg yolks. I learned this the hard way: hot chocolate seizing eggs is a real mood killer, and you’ll end up with scrambled mess instead of silky mousse. A quick ice bath for the chocolate-butter mix works wonders.
- Use Room-Temp Eggs: Cold eggs from the fridge whip up stiff and break easily, turning your mousse into a lumpy disaster. Let the whole eggs sit in warm water for 10 minutes before separating—just enough to make them handle like butter. Trust me, your future self will notice the difference when folding in the cream.
- Whip the Cream Cold: Heavy cream straight from the fridge whips faster and holds its volume better than lukewarm cream, which can turn buttery and collapse. Chill your mixing bowl and beaters in the freezer for 5 minutes first—this isn’t the prettiest method, but it guarantees fluffy peaks that don’t deflate when folded in.
- Strain the Chocolate: Even high-quality bittersweet chocolate can have gritty bits that ruin texture. Melt it, then strain through a fine-mesh sieve into the egg mixture—yes, it’s an extra step, but it’s the thing that matters most for that velvety finish. Skip this, and you’ll taste every speck later.
Common mistakes when making this dish
Over-Melting Chocolate
Never let your chocolate get too hot while melting—temperatures above 115°F cause it to seize and become grainy. I've ruined batches by using high heat or boiling water directly under the bowl. Instead, use a double boiler with simmering water (never boiling) and stir constantly.
The chocolate should melt smoothly and reach 110-115°F for perfect tempering. If it starts to look dull or streaky, you've gone too far—start over with fresh chocolate. 💛
Skipping Egg Tempering
Whisking eggs over a double boiler until they reach 160°F is non-negotiable for texture. Cold eggs will scramble when mixed with warm chocolate, creating a dense, curdled mess. I once made this mistake and ended up with a pudding-like disaster.
Use a candy thermometer—this is the only way to get consistent results. If you don't have one, test with a spoon: the eggs should coat the back smoothly without being runny. 🍳
Over-Whipping Cream
Whipping cream to stiff peaks is crucial, but overdoing it turns it into butter. I've seen people whip for 10 minutes straight—don't be that person! The cream should hold soft peaks that just barely collapse when you lift the beaters.
For reference, that's about 3-4 minutes in a stand mixer. If you're unsure, test it immediately—once it starts breaking down, you can't reverse it. 🥛
Rough Folding Technique
Folding is where most mousse disasters happen. Using a spatula too aggressively or mixing in circles breaks down the air bubbles, resulting in dense, heavy mousse. Instead, work in a figure-eight motion and fold gently—just until the previous addition disappears.
I like to reserve ⅓ of the whipped cream for last to maintain maximum airiness. Patience here makes all the difference. ✨
Under-Chilling Time
Rushing the chilling process is a common mistake. Mousse needs at least 4 hours to set properly—overnight is ideal. I've served mousse after only 2 hours and ended up with a runny, soupy mess.
The texture improves as it chills, developing that perfect silky consistency. Set a reminder if you need to—your guests will notice the difference! ⏰
Ignoring Temperature Balance
Combining ingredients at vastly different temperatures causes the cream to separate or the eggs to scramble. Always ensure your melted chocolate is warm but not hot (110°F), your egg mixture is at room temperature, and your whipped cream is cold.
I keep my cream bowl chilled in the freezer for 10 minutes before whipping to prevent overheating. This balance is what creates that signature velvety texture. 🌡️
Nutrition facts
Frequently asked questions
Can I substitute dark chocolate for bittersweet?
Use the same amount of 60-70% cocoa dark chocolate—it's essentially the same thing. Avoid milk chocolate (it's too sweet) or white chocolate (no cocoa content). The higher the cocoa percentage, the more intense the bittersweet flavor. For extra depth, try a 72% cocoa bar if you love bold chocolate.
Why did my mousse turn grainy?
Graininess usually means your chocolate overheated or seized. Always melt chocolate gently over simmering water (never boiling) and keep temps below 115°F. If it looks dull or streaky, start over—there's no fixing seized chocolate. For smooth results, chop chocolate finely before melting.
Can I make this without eggs?
Yes! For a vegan version, replace eggs with 1 cup aquafaba (chickpea brine) whipped to stiff peaks, plus 2 tbsp cornstarch mixed into the melted chocolate. The texture will be slightly denser but still delicious. Another option is silken tofu blended with 2 tbsp maple syrup—fold it into the chocolate mixture instead of eggs.
How do I make it less sweet?
Reduce the sugar to 2 tablespoons or omit it entirely if you prefer intense chocolate flavor. The bittersweet chocolate already provides natural sweetness. For extra richness, add ½ tsp vanilla bean paste or 1 tsp orange zest—these enhance chocolate's natural sweetness without sugar. Taste as you go!
What's the best way to serve it?
Serve in elegant glasses with fresh raspberries or blackberries on top for a fruity contrast. Dust with cocoa powder and flaky salt for sophistication. For a make-ahead party dessert, prepare the base 2 days ahead and whip the cream fresh before serving. Chill for 4+ hours before serving for perfect texture.