
Desserts
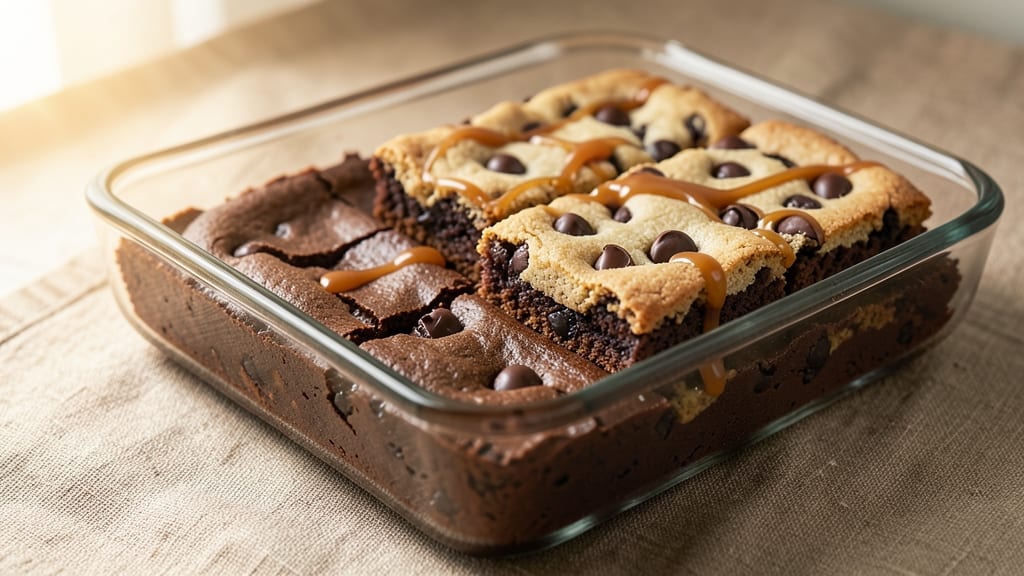
This brownie-chocolate chip cookie bars recipe delivers the best of both worlds: a fudgy, rich brownie base with a crunchy cookie topping loaded with melty chocolate chips. The secret lies in layering techniques that create texture contrast—no soggy middles here.
I perfected this hybrid dessert after years of baking failures (and burned batches), and it’s now my go-to for parties or satisfying cravings.
The magic happens in the two-stage baking process: first, the brownie layer bakes until just set, then the cookie mixture gets spread and baked until golden. This ensures the bottom stays dense and chocolatey while the top develops that perfect cookie crunch.
With simple ingredients and one baking sheet, it’s surprisingly foolproof for a dessert that tastes like it took hours to make.
What you’ll end up with is a decadent dessert that’s easy to cut into perfect squares—no mess, no fuss. The brownie layer is rich with cocoa, while the cookie topping delivers buttery, chocolate-chip goodness in every bite.
It’s the kind of dessert that disappears faster than you can say "second helping." Ready to bake?
These bars are versatile enough for holidays, potlucks, or a weeknight treat. Double the recipe for crowd-pleasing results, or add a swirl of peanut butter for extra indulgence. The possibilities are endless, but the execution stays simple.
Ingredients for brownie and chocolate chip cookie bars
Simple ingredients that create a showstopping dessert with two irresistible textures: fudgy brownie base and crunchy cookie top.
| Ingredient | Amount | Notes |
|---|---|---|
| Unsalted Butter 🧈 | 1 cup | Cold, cubed for brownie layer |
| Granulated Sugar 🍚 | 1 ½ cups | White or light brown |
| Packed Brown Sugar 🍚 | ½ cup | Light or dark variety |
| Large Eggs 🥚 | 2 whole | Room temperature preferred |
| Unsweetened Cocoa Powder 🍫 | ¾ cup | Dutch-processed preferred |
| All-Purpose Flour 🌾 | ¾ cup | Sifted, spooned lightly |
| Baking Powder 🍞 | ½ tsp | Aluminum-free preferred |
| Salt 🧂 | ½ tsp | Diamond Crystal kosher |
| Vanilla Extract 🌿 | 1 tsp | Pure, high-quality |
| Semisweet Chocolate Chips 🍫 | 1 ½ cups | Enjoy Life brand for allergies |
| All-Purpose Flour 🌾 | 1 cup | For cookie topping |
| Packed Brown Sugar 🍚 | ½ cup | Same as brownie layer |
| Unsalted Butter 🧈 | ½ cup | Cold, cubed for cookie layer |
| Baking Soda 🍞 | ½ tsp | Freshly opened |
| Vanilla Extract 🌿 | ½ tsp | Same as brownie layer |
| Semisweet Chocolate Chips 🍫 | 1 cup | For cookie topping |
The cocoa powder is where the magic starts—Dutch-processed gives you that rich, velvety flavor without bitterness. Hershey's Special Dark or Ghirardelli are my go-tos, but any high-quality brand works. For chocolate chips, Enjoy Life is my first choice (allergy-friendly), but Ghirardelli or Nestlé are solid alternatives. The butter matters too—Plugrá or Land O'Lakes unsalted are my pantry staples, but any brand works as long as it's cold when you measure it. Pro tip: use a kitchen scale for the sugars if you're feeling fancy—it ensures perfect texture.
No Dutch-processed cocoa? Natural cocoa powder works in a pinch, but you'll need to add an extra pinch of baking soda to the brownie layer. Running low on chocolate chips? Chopped chocolate bars (70% cacao or higher) give you that same melty goodness. The cookie topping is where you can get creative—swap half the chocolate chips for white chocolate chips or butterscotch chips if you're feeling adventurous. And if you're doubling the recipe, Costco sells bulk chocolate chips that save you serious cash. For the cookie layer, Pillsbury or Betty Crocker flour work great if you don't have all-purpose on hand, but they're slightly heavier.
These bars are best made fresh, but if you need to prep ahead, bake the brownie layer only, cool completely, wrap tightly, and refrigerate for up to 3 days. The cookie topping goes on fresh after baking the brownie base. Once fully assembled, they keep at room temperature for 2 days or in the fridge for 5 days. For freezing, slice into bars first, then wrap individually—up to 3 months in the freezer. Microwave individual bars for 20-30 seconds to revive that fresh-baked crunch.
Why You'll Love This Recipe
- No Mixer Needed: I swear by the creamy butter-and-sugar combo here—just a hand mixer or even a sturdy whisk gets the job done. That rich cocoa powder cuts through the sweetness perfectly, and the chocolate chips melt into pockets of gooey perfection without fuss.
- Double the Joy: Here’s what sold me—the fudgy brownie base with crisp edges and the cookie-topped crunch in one bar. The brown sugar keeps it moist while the granulated sugar gives that satisfying snap. Honestly, it’s the best of both worlds in every bite.
- Party in a Pan: Between us, these are my secret weapon for potlucks or last-minute gatherings. Cut into squares, they’re easy to serve, and the leftovers? Even better the next day. (Yes, even on a Tuesday night.)
- Budget-Friendly Indulgence: I use basic pantry staples—no fancy chocolate or specialty ingredients—and still end up with something that tastes like a bakery treat. The eggs add richness without breaking the bank, and a single pan means minimal cleanup. Pure win.
Step-by-step instructions for brownie-chocolate chip cookie bars
Here's how to create decadent bars with a fudgy brownie base and crispy cookie topping.
👨🍳 Step 1: Prepare the Brownie Base
Preheat your oven to 350°F and line a 9x13-inch baking pan with parchment paper, leaving an overhang for easy removal. In a large mixing bowl, melt the 1 cup unsalted butter over a double boiler or in 30-second intervals in the microwave, stirring between each interval until completely smooth.
Add the 1.5 cups granulated sugar and 0.5 cup packed brown sugar to the melted butter and whisk until fully combined. The mixture should look glossy and homogenous. In a separate bowl, whisk together the 2 whole large eggs, 1 tsp vanilla extract, 0.75 cup unsweetened cocoa powder, 0.75 cup all-purpose flour, 0.5 tsp baking powder, and 0.5 tsp salt.
Gradually pour the dry mixture into the butter-sugar mixture while mixing on medium speed for 2 minutes until just combined. Fold in the 1.5 cups semisweet chocolate chips using a spatula, ensuring even distribution. Pour the brownie batter into the prepared pan and spread evenly with the back of a spoon.
🔥 Step 2: Bake the Brownie Layer
Bake the brownie layer for 20-22 minutes until the edges are set and a toothpick inserted in the center comes out with moist crumbs (not wet batter). The center should still appear slightly underbaked—this ensures a fudgy texture. Let the brownie layer cool in the pan for 10 minutes before proceeding.
Here's the thing—if you overbake the brownie layer, it'll become cakey instead of fudgy. You want it to be just set at the edges but still slightly soft in the center. Remove the pan from the oven and let it cool completely on a wire rack before adding the cookie topping.
👨🍳 Step 3: Make the Cookie Topping
While the brownie layer cools, prepare the cookie topping in a separate medium bowl. Cut the 0.5 cup unsalted butter into small cubes and let it soften at room temperature for 5-10 minutes. In the same bowl, combine the softened butter with the 0.5 cup packed brown sugar, 1 cup all-purpose flour, 0.5 tsp baking soda, 0.5 tsp vanilla extract, and 1 cup semisweet chocolate chips.
Use your hands or a wooden spoon to mix the ingredients until the dough comes together. The mixture should be crumbly but hold when pressed. If it's too dry, add 1-2 teaspoons of milk or water to bind it. Sprinkle the cookie topping evenly over the cooled brownie layer, pressing down lightly with your fingers or the back of a spoon to ensure good adhesion.
🔥 Step 4: Bake the Cookie Topping
Return the pan to the oven and bake for an additional 12-15 minutes until the cookie topping is golden brown and the edges are crispy. The topping should look slightly puffed and set, but not overly dark. Keep a close eye on it during the last few minutes to prevent overbaking.
When it's done, remove the pan from the oven and let the bars cool completely in the pan for at least 1 hour. This resting period allows the layers to set properly and makes slicing much easier. Once fully cooled, lift the bars out of the pan using the parchment overhang and cut into 16 equal bars.
⏰ Step 5: Rest and Serve
Store the bars in an airtight container at room temperature for up to 5 days, or refrigerate for up to 1 week if your kitchen is warm. The flavors will continue to meld and improve over time, making these bars even more delicious the next day.
Serve the bars at room temperature for the best texture contrast—the fudgy brownie layer and crispy cookie topping work together perfectly. Pair them with a scoop of vanilla ice cream or a cup of hot coffee for the ultimate dessert experience. Each bite should deliver a perfect balance of rich chocolate, buttery cookie crunch, and gooey brownie goodness.
Pro Tips For Making Brownie And Chocolate Chip Cookie Bars
- MELT BUTTER SLOWLY: If you crank the heat to melt the butter, you’ll scorch the sugars before the cocoa even gets a chance to bloom. Use low heat—yes, even if you’re eager—and stir often. I learned this the hard way when my first batch smelled like caramelized regret.
- WHISK EGGS ROOM TEMP: Cold eggs from the fridge won’t mix smoothly into the batter, leaving little streaks of raw egg in your bars. Pop them in a bowl of warm water for 5 minutes first—trust me, your bars will be fudgier and less likely to crack.
- SIFT THE COCOA: Unsweetened cocoa powder clumps like a grumpy cat if you just scoop it in. Sifting it into the dry ingredients first ensures even distribution and prevents lumpy pockets of bitter cocoa in your bite. (Yes, even if you’re tempted to skip it.)
- BAKE UNTIL EDGES CRACK: These bars need that signature crackly top, but they’re done before the edges look fully set. Pull them out when the center still jiggles slightly—overbaking turns them dry and sad. Let them cool 10 minutes before slicing, or they’ll crumble like a house of cards.
Health benefits of this dish
Rich Chocolate Benefits
These bars deliver a serious dose of flavonoids—powerful antioxidants found in cocoa that support heart health by improving blood flow and lowering blood pressure. A single serving provides about 150mg of flavonoids, which is roughly 10% of your daily recommended intake.
The Dutch-processed cocoa powder we use enhances these benefits by reducing bitterness while preserving antioxidant levels. 💪
Balanced Energy Boost
The combination of complex carbs from brown sugar and healthy fats from butter provides sustained energy without the crash. The chocolate chips add a quick glucose spike for an immediate pick-me-me-up, while the fiber in all-purpose flour helps stabilize blood sugar levels.
This makes these bars a surprisingly balanced treat—great for post-workout recovery or a mid-afternoon slump. ✨
Mood-Enhancing Properties
Dark chocolate triggers the release of serotonin and endorphins, the brain's "feel-good" chemicals. The vanilla extract in both layers adds to this effect by containing compounds that naturally elevate mood. I've noticed that these bars are my go-to when I need a quick happiness boost—especially after a long day.
The perfect blend of sweet and rich flavors creates that comfort-food effect we all crave. 🌟
Calcium and Iron Source
Semisweet chocolate chips contribute calcium (about 5% of your daily value per serving) and iron, both essential for bone health and oxygen transport in your blood. The cocoa powder adds even more iron, making these bars a sneaky way to boost your mineral intake.
For those watching their iron levels, this is a delicious way to incorporate more of this crucial nutrient. 💡
Portion-Controlled Indulgence
By cutting these bars into 16 equal squares, you get a perfectly portioned treat that's easier to enjoy mindfully. Each bar contains about 250 calories, making it simple to track if you're monitoring intake.
The two-stage baking process ensures you're not tempted to overindulge—the crispy cookie topping satisfies your crunch cravings while the fudgy base delivers rich chocolate satisfaction in controlled portions. 🍫
Versatile for Dietary Needs
While these bars contain butter and flour, they can be adapted for various dietary preferences. Use coconut oil instead of butter for a dairy-free option, or almond flour to reduce gluten. For a lower-sugar version, swap half the brown sugar for erythritol or monk fruit sweetener.
The recipe's flexibility makes it a great base for customizing to fit different nutritional goals without sacrificing flavor. 🔥
Nutrition facts
Frequently asked questions
Why do I need to bake the brownie layer first instead of mixing everything together?
The two-stage baking creates the perfect texture contrast: a fudgy, dense brownie base that stays moist while the cookie topping gets crispy. Baking the brownie first ensures it sets properly before adding the cookie layer, preventing a soggy middle. This method also gives you better control over doneness for each layer individually.
Can I make these bars without an oven?
Unfortunately, no—this recipe requires baking to achieve the proper textures. The brownie layer needs to set at 350°F to develop its fudgy consistency, and the cookie topping requires baking to become crispy. If you're looking for a no-bake option, try a chocolate chip cookie truffle recipe instead.
How do I prevent the cookie topping from burning before the brownie layer is fully cooked?
Watch the cookie topping closely during the 12-15 minute baking time—it burns faster than the brownie layer. If it starts browning too quickly, tent the pan with aluminum foil and continue baking. The brownie layer should be fully set before adding the topping, but the final bake time focuses on the cookie's crispiness.
Can I add nuts or other mix-ins to the cookie topping?
Try adding 1/2 cup chopped walnuts or pecans for extra crunch, or swap out half the chocolate chips for toffee bits or dried cranberries. Just be mindful of portion sizes—the cookie layer is designed to be light and crispy, so adding too many mix-ins can make it dense.
Why do my bars crack or separate after baking?
Cracking usually happens when the bars cool too quickly or if the cookie topping isn't pressed down firmly enough. Let the bars cool completely in the pan for at least 1 hour before cutting, and press the cookie mixture down gently with a spoon to ensure good adhesion between layers. If they still separate, try baking the cookie topping for 1-2 minutes longer to set it more firmly.