
Desserts
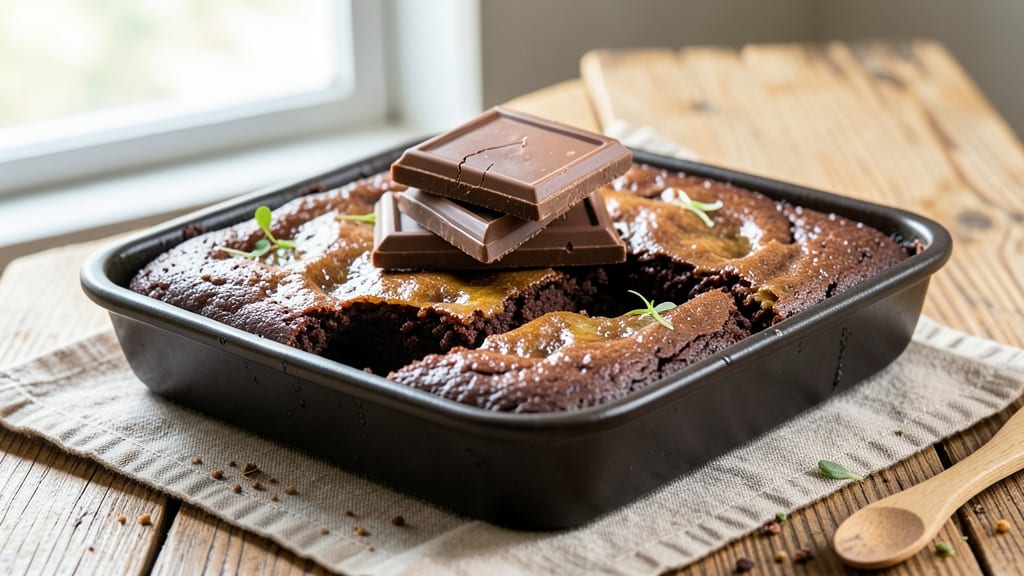
This brownie recipe with Hershey chocolate bars delivers the classic fudgy texture and rich flavor we all love, with a signature crackly top that’s impossible to resist. 💛 The secret lies in using melted Hershey bars—not cocoa powder—creating that signature Hershey’s taste and melt-in-your-mouth centers.
This isn’t just another brownie; it’s the kind that makes people ask for seconds (or thirds).
The magic happens in the mixing and baking process. A simple combination of melted butter, sugar, eggs, and vanilla comes together with chopped Hershey bars, ensuring every bite carries that unmistakable chocolatey punch.
Baking at 350°F for 25–30 minutes gives you that perfect balance: a crackly top that snaps satisfyingly, while the inside stays moist and gooey.
What sets these brownies apart is how they taste—deep, chocolatey, and slightly sweet without being overpowering. The Hershey bars melt into the batter, creating pockets of molten chocolate that make each bite feel like a little indulgence.
Whether you’re serving them warm with ice cream or cutting them into squares for a snack, they’re always a crowd-pleaser.
This recipe is adaptable too—add a sprinkle of sea salt for contrast, fold in nuts for texture, or keep it classic. The beauty of using Hershey bars is that they’re accessible, reliable, and deliver that nostalgic flavor we all crave. Let’s make these brownies!
Ingredients for brownie recipe with hershey chocolate bars
Classic Hershey chocolate bars and pantry staples—this is the ultimate nostalgic brownie combo.
| Ingredient | Amount | Notes |
|---|---|---|
| Hershey's Milk Chocolate Bars 🍫 | 12 oz | Chopped into 1-inch pieces |
| Unsalted Butter 🧈 | 1 cup | Melted, full-fat preferred |
| Granulated Sugar 🍚 | 1 ½ cups | White or light brown |
| Large Eggs 🥚 | 2 whole | Room temperature |
| Vanilla Extract 🌿 | 1 tbsp | Pure extract, not imitation |
| All-Purpose Flour 🌾 | ¾ cup | Sifted for smooth batter |
| Baking Powder 🧂 | ½ tsp | Aluminum-free preferred |
| Salt 🧂 | ¼ tsp | Fine sea salt |
| Flaky Sea Salt 🧂 | 1 tbsp | For crackly top (optional) |
The Hershey bars are non-negotiable here—Hershey's Milk Chocolate delivers that signature taste. Grab a 12-ounce family-size bar from any grocery store (Walmart or Target have them cheap), or grab individual bars for portion control. Chop them into 1-inch chunks—this ensures those melt-in-your-mouth pockets. Pro tip: Microwave the butter for 40 seconds to just melt it—no greasy mess. The sugar can be white or light brown; I usually grab Domino brand because it's consistent and affordable. For the eggs, room temperature makes all the difference—just take them out 10 minutes before mixing.
No vanilla extract? Vanilla bean paste works too, or even vanilla sugar at half the amount. Short on flour? Cake flour at the same quantity gives a lighter texture. The baking powder is key here—aluminum-free prevents any metallic aftertaste. For the crackly top, Maldon flaky sea salt is my go-to, but any flaky salt (or even regular coarse salt) works in a pinch. Want to skip the salt entirely? No judgment—just leave it out. The Hershey bars melt better if you roughly chop them—no need for precision here.
Store leftovers in an airtight container at room temperature for 3-4 days, or refrigerate for 1 week if you want them to stay fudgy longer. These reheat beautifully—30 seconds in the microwave brings back that warm, gooey magic. I always make a double batch because they disappear fast. Freeze extras in single-serving portions for quick treats. The crackly top? Best enjoyed fresh, but the fudgy centers keep for days.
Why You'll Love This Recipe
- No Chopping Needed: I swear by this recipe because it’s that simple—just melt chocolate and butter together, mix in eggs and sugar, then bake. Honestly, my 10-year-old could handle it (and has, multiple times).
- Rich Without Effort: That Hershey’s chocolate? It’s the star—fudgy, not cakey, with just enough vanilla to make it sing. The secret’s in the butter-to-sugar ratio; it’s foolproof for maximum melt-in-your-mouth goodness.
- Party or Pajamas: These brownies work for everything—a last-minute potluck, a quick dessert for date night, or my go-to midnight snack. Cut into squares, and they’re even easier to share (or sneak).
- Budget-Friendly Leftovers: A single batch feeds my family of four and leaves extras that last days. Freeze half for lazy mornings—just reheat slices in the microwave. No waste, all flavor.
Step-by-step instructions for fudgy crack-top brownies
Here's how to make these rich, decadent brownies with that perfect crackly top and gooey centers.
🍳 Step 1: Melt Chocolate and Butter Together
Line a 9x13-inch baking pan with parchment paper, leaving an overhang on all sides for easy removal. Chop the 12 oz Hershey's Milk Chocolate Bars into 1-inch pieces and place them in a heatproof bowl along with the 1 cup melted unsalted butter. I use a microwave in 30-second bursts, stirring between each, until both are completely melted and smooth. The mixture should be 110-115°F—not too hot or the eggs will scramble later.
Here's the thing—don't skip the temperature check. If the chocolate looks grainy, stir in an extra 10 seconds of heat. Once smooth, remove from heat immediately and let it cool slightly for 2 minutes while you prepare the next ingredients. The chocolate should be warm but not steaming when you add the eggs.
👨🍳 Step 2: Whisk in Sugar and Eggs for Smooth Batter
Add the 1.5 cups granulated sugar to the melted chocolate mixture and whisk vigorously for 2-3 minutes until fully combined and the mixture is thick and glossy. This step ensures your brownies have that perfect fudgy texture. I use a hand mixer on medium speed—it's faster than whisking by hand and prevents air bubbles.
Next, add the 2 whole room-temperature eggs, one at a time, whisking well after each addition. Then stir in the 1 tbsp vanilla extract. The batter should be thick but pourable—almost like a rich pudding. If it looks too thin, let it sit for 5 minutes to thicken slightly. This is your window to adjust consistency before adding dry ingredients.
🥘 Step 3: Fold in Dry Ingredients Gently
In a separate bowl, whisk together the 0.75 cup sifted all-purpose flour, 0.5 tsp baking powder, and 0.25 tsp salt. Sift again right before mixing to prevent lumps—this makes all the difference in texture. Gently fold the dry ingredients into the chocolate mixture using a spatula, mixing just until combined. Don't overmix; you want to maintain that thick, fudgy consistency.
Here's where it gets fun—sprinkle the 1 tbsp flaky sea salt evenly over the batter. This isn't just for flavor; it creates those beautiful crackly patterns on top when baked. Use a fork to gently swirl the salt into the top layer, creating marbled patterns. The salt will melt slightly during baking, creating those irresistible crunchy bits.
🔥 Step 4: Bake Until Edges Are Set but Centers Are Gooey
Pour the batter into the prepared pan and smooth the top with a spatula. Bake in a 350°F preheated oven for 25-30 minutes. You're looking for edges that are just set but centers that still look slightly underbaked and jiggly. A toothpick inserted in the center should come out with moist crumbs—not wet batter, but not completely clean either.
Don't overbake! The brownies will continue cooking as they cool, and you want that perfect fudgy texture. The top should have beautiful crackly patterns from the flaky salt, and the edges should be slightly pulled away from the pan. If you're unsure, err on the side of underbaking—they'll firm up as they cool.
⏰ Step 5: Cool and Cut for Perfect Slices
Remove the pan from the oven and let the brownies cool in the pan for 1 hour at room temperature. This resting period is crucial—it allows the brownies to set properly and makes them easier to cut. Don't be tempted to cut them earlier, or you'll end up with crumbly slices.
Once cooled, use the parchment paper overhang to lift the brownies out of the pan and cut into 12 equal squares (about 2-inch squares). Each piece should have that perfect balance of fudgy texture, crackly top, and melty chocolate center. Store leftovers in an airtight container at room temperature for up to 3 days, or freeze for up to 3 months.
Pro Tips For Making Brownie Recipe With Hershey Chocolate Bars
- CHOP CHOCOLATE SMALL: I learned this the hard way—Hershey bars break unevenly, and big chunks melt into clumps instead of smooth pockets. Pulse them in a food processor until they’re rice-sized, then fold them in at the last second so they stay distinct.
- MELT BUTTER SLOW: Skip the microwave’s “melt fast” setting—it burns butter before it’s fully liquid. Use a double boiler or a heatproof bowl over simmering water, stirring until it’s just clear and golden, not browned. Trust me, your brownies will taste richer.
- STOP WHEN EDGES CRACK: That’s right, pull them out before they look fully set. The center will still jiggle like Jell-O, but it’s the only way to avoid dry, cakey brownies. Tent with foil the last 5 minutes to lock in moisture—your future self will thank you.
- USE ROOM-TEMP EGGS: Cold eggs from the fridge mix into lumpy batter that never emulsifies right. Let them sit in warm water for 10 minutes first, then whisk them smooth. This isn’t the prettiest method, but it’s the tastiest—no one will guess you took an extra step.
Serving suggestions for leftovers
Classic Ice Cream Pairing
Warm brownies and cold ice cream are a match made in heaven. I always serve these with vanilla bean ice cream—its creamy texture contrasts beautifully with the fudgy centers. For extra decadence, try coffee-flavored ice cream or even salted caramel to complement the chocolate.
Scoop a generous portion and let the ice cream melt slightly into the brownie for that perfect balance of warm and cool. 🍦
Whipped Cream Topping
A dollop of homemade whipped cream adds a light, airy contrast to the rich brownies. I like to mix in ½ teaspoon vanilla extract and a pinch of flaky sea salt for extra flavor.
For a fun twist, drizzle with chocolate syrup or sprinkle with crushed peppermint for a festive touch. This works especially well if you're serving them at a party or dessert bar.
Fruit Complements
Bright, fresh fruit cuts through the richness of these brownies beautifully. I recommend strawberries or raspberries for their natural sweetness and acidity. Slice them thinly and arrange them alongside the brownies, or even on top of the ice cream.
For a tropical vibe, try mango slices or pineapple chunks—they add a refreshing contrast to the deep chocolate flavor.
Coffee or Espresso Drizzle
If you love coffee, drizzle a little hot espresso or caramel coffee syrup over the brownies right before serving. The bitterness of the coffee enhances the chocolate flavor, creating a sophisticated dessert experience.
I often pour a small amount of espresso over the top and let it soak in for a few seconds before serving. This works especially well with mocha-flavored ice cream. ☕
Nutty Additions
For texture lovers, add a sprinkle of toasted pecans or chopped walnuts on top of the brownies. Toast the nuts in a dry pan over medium heat for 3-4 minutes until fragrant, then chop them coarsely.
The nuts add a satisfying crunch that balances the fudgy texture. If you're feeling adventurous, try hazelnuts for a Nutella-inspired twist.
Warm Spiced Milk
For a cozy dessert experience, serve these brownies with a warm cup of spiced milk or hot chocolate. I like to heat 2% milk with a pinch of cinnamon, nutmeg, and a splash of vanilla extract.
The warmth of the milk enhances the chocolate flavor and makes the brownies feel even more indulgent. Perfect for a chilly evening or a comforting dessert after dinner. 🌟
Nutrition facts
Frequently asked questions
Can I substitute Hershey bars with other chocolate?
Yes, but the flavor and texture will change. Use 12 oz of high-quality milk chocolate bars (like Ghirardelli) for the closest result. Dark chocolate (60% or higher) will make the brownies more bitter, while white chocolate won't melt properly. If using semi-sweet chocolate chips, melt them with the butter to mimic the Hershey texture.
Why did my brownies turn out cakey instead of fudgy?
This usually happens from overmixing or baking too long. The key is mixing just until combined and pulling them from the oven when edges are set but centers still jiggle slightly. Also, make sure your oven isn't running hot—use an oven thermometer to confirm it's at 350°F. Underbaking slightly helps too.
How do I make these brownies gluten-free?
Replace the 0.75 cup all-purpose flour with 0.75 cup gluten-free 1:1 baking flour (like Bob's Red Mill). Add 0.5 teaspoon xanthan gum to help bind the batter. Also, use gluten-free baking powder. The texture will be slightly different but still delicious. Test with a small batch first to check consistency.
Can I make these brownies in a different pan size?
Yes, but you'll need to adjust baking time. For an 8x8-inch pan, bake 20-25 minutes (they'll bake faster). For a 9x13-inch pan, stick with 25-30 minutes. Always check for doneness with the toothpick test. The batter should be spread ½-inch thick in the pan for even baking.
What's the secret to that perfect crackly top?
The crackly top comes from the flaky sea salt and proper baking technique. Sprinkle the salt evenly and swirl it into the batter before baking. Remove the brownies from the oven when the edges are set but centers are still soft—they'll continue cooking as they cool. Let them rest 1 hour before cutting for best results.