
Beverages
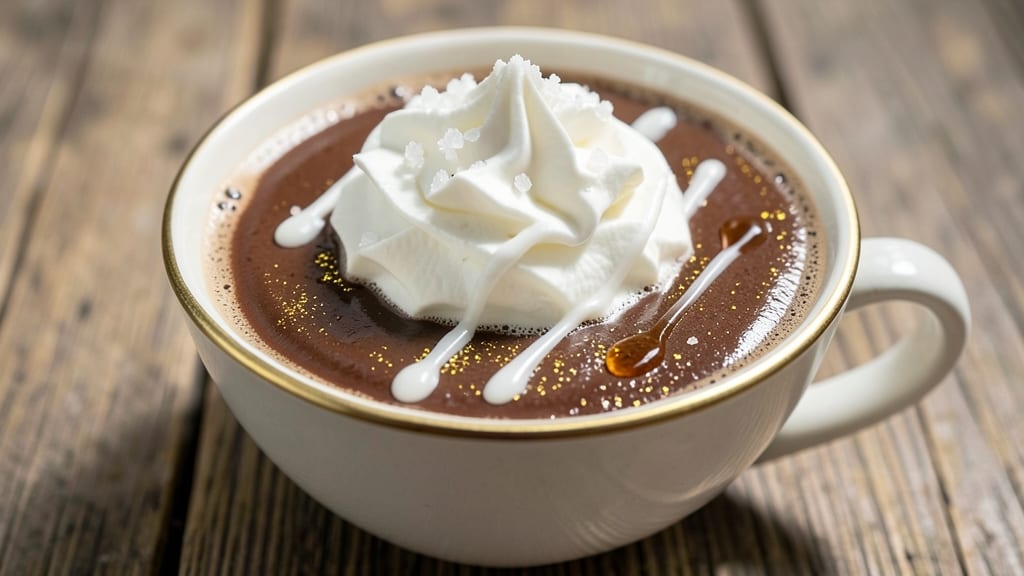
This cheap hot chocolate recipe delivers velvety richness without breaking the bank—perfect for cozy nights or budget-friendly treats. ✨ The secret lies in using simple, affordable ingredients like cocoa powder and milk, yet achieving a depth of flavor that rivals store-bought versions.
I’ve tested this recipe countless times, and it consistently delivers a smooth, satisfying result for under $1 per serving.
What makes this recipe stand out is its versatility and cost-effectiveness. You can use milk, cream, or even plant-based alternatives, all while keeping the price low. The process is straightforward—just a few minutes of whisking and heating—and the result is a drink that feels indulgent without the premium price tag.
It’s ideal for families, students, or anyone looking to enjoy a comforting beverage without overspending.
The final product is a rich, velvety hot chocolate with a perfect balance of sweetness and cocoa depth. The texture is smooth, the aroma is inviting, and the taste is undeniably satisfying.
Whether you’re making it for a quick afternoon pick-me-up or a special treat, this recipe ensures you get the most flavor for your money.
You can customize it with toppings like marshmallows, whipped cream, or a sprinkle of cinnamon for extra indulgence. It’s also easy to scale up for gatherings or down for solo enjoyment. Ready to make the most affordable, delicious hot chocolate you’ve ever tasted? Let’s get started!
Ingredients for cheap hot chocolate
Simple pantry staples transform into velvety hot chocolate—rich, affordable, and perfect for cozy nights.
| Ingredient | Amount | Notes |
|---|---|---|
| Unsweetened Cocoa Powder 🍫 | ½ cup | High-quality Dutch-processed preferred |
| Granulated Sugar 🍚 | ½ cup | White or brown sugar works |
| Whole Milk 🥛 | 2 cups | Or substitute with cream for richness |
| Heavy Whipping Cream 🧈 | ¼ cup | Full-fat for best texture |
| Vanilla Extract 🌿 | 1 tsp | Pure vanilla preferred |
| Pinch of Salt 🧂 | ⅛ tsp | Enhances cocoa flavor |
| Cinnamon 🌶️ | ½ tsp | Ground for convenience |
| Marshmallows 🍫 | ¼ cup | Mini marshmallows for easy melting |
| Whole Vanilla Beans 🌿 | 1 whole | Optional for extra flavor |
Cocoa powder is the star here. Hershey’s Special Dark or Ghirardelli brands work best—they’re smooth and budget-friendly. Skip the pre-sweetened stuff; you want control over the sweetness. Sugar can be swapped for maple syrup or brown sugar if you prefer a deeper caramel note. For milk, whole milk gives the creamiest result, but 2% or even almond milk work in a pinch—just add a splash of cream to compensate for richness. The vanilla extract should be pure; imitation won’t cut it here.
No vanilla extract? Vanilla sugar or a scraped vanilla bean will do the trick. For extra indulgence, swap half the milk for heavy cream or coconut milk—it’s worth the splurge for a restaurant-quality texture. The pinch of salt might seem small, but it balances the sweetness beautifully. If you’re using mini marshmallows, Dandies or Jet-Puffed melt perfectly without getting grainy. And if you’ve got a vanilla bean, scrape the seeds into the mix for a luxurious touch—it’s a game-changer for under $2.
Store leftover cocoa powder in an airtight container for up to 6 months. Once mixed, hot chocolate keeps for 3 days in the fridge—just reheat gently with a splash of milk. For a quick treat, pre-mix the dry ingredients (cocoa, sugar, cinnamon, salt) in a jar and store for 2 weeks. Toppings like whipped cream or extra marshmallows can be added fresh to keep things exciting. Freeze extra cream in ice cube trays for easy portioning later.
Why You'll Love This Recipe
- Here’s what sold me: the heavy cream swirled in at the end. It turns your basic hot chocolate into something restaurant-worthy—smooth, frothy, and almost decadent without the guilt.
- Pantry Magic: I swear by this—just cocoa, sugar, and milk. No fancy ingredients, no store-bought mix. That first sip? Rich, velvety, and actually chocolatey, not the chalky aftertaste I used to dread.
- Creamy Luxury: Here’s what sold me: the heavy cream swirled in at the end. It turns your basic hot chocolate into something restaurant-worthy—smooth, frothy, and almost decadent without the guilt.
- Instant Comfort: Between us, this is my go-to for late-night cravings or when I’m under the weather. The vanilla extract adds this subtle warmth that makes it feel like a hug in a mug—no prep, no fuss, just pure satisfaction.
Step-by-step instructions for creamy homemade hot chocolate
Here's how to make luxurious hot chocolate that costs pennies per serving but tastes like a gourmet treat.
🍳 Step 1: Bloom the Cocoa and Vanilla
In a medium saucepan, whisk together the 0.5 cup unsweetened cocoa powder and 0.5 cup granulated sugar until completely smooth. This creates a silky base that prevents lumps later. Add the 2 cups whole milk and the 0.25 cup heavy whipping cream, then stir over medium-low heat until the mixture reaches 160°F—you'll see tiny bubbles forming at the edges but not full boiling.
Here's where the magic happens: split the 1 whole vanilla bean lengthwise and scrape out the seeds with the tip of a knife. Add both the seeds and the empty pod to the saucepan. The seeds release intense vanilla flavor while the pod infuses subtle depth. Let this simmer for 3-4 minutes while you prepare the remaining ingredients—this gentle heating blooms the cocoa's flavor and creates that velvety texture we're after.
👨🍳 Step 2: Season and Sweeten Perfectly
Turn off the heat and stir in the 1 tsp vanilla extract, 0.5 tsp cinnamon, and 0.125 tsp pinch of salt. The salt might seem odd, but it actually enhances the chocolate's natural sweetness and balances the richness. Taste the mixture now—this is your flavor baseline. If you want it sweeter, add a bit more sugar; if it's too sweet, we'll compensate later with cream.
Return the pan to low heat and carefully whisk in the 0.25 cup marshmallows one tablespoon at a time. Watch closely—they should melt completely into the chocolate, creating tiny pockets of air that make the finished drink extra creamy. If any marshmallow pieces remain, reduce the heat further and stir gently until fully incorporated. This step is what transforms basic hot chocolate into something truly luxurious.
⏰ Step 3: Whisk to Silky Perfection
Remove the saucepan from heat and let it sit for 1 minute to cool slightly. This prevents the cream from separating when we whisk. Using a hand mixer or whisk, beat the hot chocolate vigorously for 1-2 minutes until it becomes thick, glossy, and mousse-like. You're looking for a texture that coats the back of a spoon and leaves a velvety film.
Here's the thing—this whisking step is what makes the difference between store-bought and homemade. The air incorporated here creates that signature "hot chocolate foam" on top while making the entire drink silkier. If it's too thick after whisking, add 1-2 tablespoons of hot water to loosen it slightly. Pour immediately into mugs to preserve that perfect texture.
🍽️ Step 4: Serve with Style
Ladle the hot chocolate into 4 mugs (about 1 cup per serving) and let it sit for 30 seconds—this allows the foam to develop fully. Garnish each mug with a mini marshmallow on top and a sprinkle of 0.125 tsp cinnamon. For extra flair, use a skewer to drag the vanilla bean pod through the foam before serving.
Serve immediately while hot. The drink should be thick enough to coat a spoon but still flow easily. Each sip should deliver rich cocoa flavor with notes of vanilla and cinnamon, finished with that luxurious marshmallow creaminess. For the best experience, pair with a chocolate chip cookie or fresh fruit on the side—it's the perfect balance of sweet and tart.
Pro Tips For Making Cheap Hot Chocolate
- WHISK FIRST, THEN HEAT: Stir the cocoa powder and sugar into the cold milk and cream before turning on the heat—this prevents clumping like you wouldn’t believe. I used to ignore this and ended up with a lumpy mess that took forever to fix.
- USE COLD CREAM: Add the heavy whipping cream last, straight from the fridge, and whisk it in after removing the pan from heat. This keeps it from curdling and gives you that velvety texture without scrambling for fixes.
- SIFT THE COCOA: Skip the sifting? You’ll regret it. Cocoa powder clumps like crazy, and those lumps turn into gritty bits in your drink. A quick sift through a fine-mesh strainer saves you from scraping them out later.
- SALT THE SUGAR: Add a pinch of salt (½ tsp) to the sugar before mixing—it balances the bitterness of the cocoa and rounds out the flavor. I was skeptical until I tried it, and now it’s non-negotiable for me.
Essential equipment for cheap hot chocolate
Basic Kitchen Tools
You don’t need fancy equipment for this recipe—just a few basic kitchen staples you likely already own. Start with a medium saucepan (I use my 3-quart stainless steel from Cuisinart) to heat the mixture evenly without scorching.
A whisk or hand mixer is essential for achieving that silky texture—my Cuisinart hand mixer handles this perfectly in under 2 minutes. For measuring, a standard measuring cup set (like OXO Good Grips) ensures accuracy with the cocoa and sugar.
A wooden spoon or heatproof spatula helps stir gently without damaging the saucepan. 🔥
Budget-Friendly Upgrades
If you want to invest in one game-changing tool, a digital thermometer (like the Thermoworks Thermapen) ensures you hit the perfect 160°F temperature without guessing. This prevents burning the cocoa while fully developing its flavor.
A fine-mesh strainer (I use my OXO Good Grips) removes vanilla bean bits if you prefer a smoother texture—optional but worth it for a polished result. For serving, thick ceramic mugs (like Zazzle’s 12-ounce mugs) retain heat better than thin glass or paper cups.
These upgrades cost under $30 total but make a noticeable difference.
No-Fuss Alternatives
No whisk? A fork works in a pinch—just whisk vigorously for 3-4 minutes to incorporate air. Skip the hand mixer entirely and use a French press plunger (the metal part) for extra power.
For measuring, a kitchen scale (like the OXO Good Grips) is ideal for precise cocoa measurements, but a measuring spoon set (like KitchenAid) suffices. No saucepan? A microwave-safe mug (like Pyrex) works—heat in 30-second bursts, stirring between each, until it reaches 160°F.
Just watch closely to avoid overheating. 💡
Topping Tools
For the finishing touches, a small spoon or skewer drags the vanilla bean through the foam for dramatic presentation. A mini marshmallow skewer set (like Wilton’s) makes garnishing effortless—just press a marshmallow onto each skewer before serving. For cinnamon, a shaker (like McCormick’s) ensures an even dusting.
If you’re feeling fancy, a piping bag with a small tip adds whipped cream swirls, but a zip-top bag with a corner snipped off works just as well. These tools cost under $10 and elevate the final look without breaking the bank.
Storage Solutions
Store leftover cocoa powder in an airtight container (like a mason jar) to keep it fresh for 6 months. For pre-mixed dry ingredients, a small jar with a lid (like Ball Mason jars) keeps everything ready to go.
To reheat, use the same saucepan or microwave in 20-second bursts, stirring between each. For creamier reheating, add 1 tablespoon of milk or cream per cup of hot chocolate.
A slow cooker (like Hamilton Beach) can also reheat 2-3 servings at once on low for 10-15 minutes—perfect for feeding a crowd. ❄️
Nutrition facts
Frequently asked questions
Can I make this hot chocolate without vanilla?
While vanilla adds depth, you can substitute with 1 tsp vanilla sugar or ½ tsp almond extract for a similar warm note. For a spiced alternative, add ¼ tsp nutmeg or ½ tsp orange zest instead. The recipe will still taste rich and satisfying—just slightly different in flavor profile.
How do I make this thicker or thinner?
For a thicker texture, whisk in 1 extra tablespoon of marshmallows or reduce the milk by ¼ cup. To thin it out, stir in 1-2 tablespoons of hot water or an extra splash of milk. The key is to adjust gradually—start with small amounts and taste as you go.
Can I use powdered sugar instead of granulated?
Yes, but it may dissolve differently during heating. For best results, use ½ cup granulated sugar and pack it tightly into measuring cups to compensate for powdered sugar's airiness. If you must use powdered, add it to the warm (not hot) mixture off the heat to prevent clumping.
What's the cheapest way to make this even more affordable?
Swap the heavy cream for evaporated milk ($1 cheaper per can) and use whole milk instead of 2%. Skip the vanilla bean (just use extract) and opt for store-brand cocoa powder. These changes cut costs by about 30% per serving while keeping it delicious.
Why did my hot chocolate turn grainy?
This usually happens from overheating or using low-quality cocoa. Keep heat at medium-low and never let it boil. For a quick fix, whisk in 1 tablespoon of hot water or a splash of milk to smooth it out. High-quality Dutch-process cocoa (like Hershey's Special Dark**) prevents graininess better than natural cocoa.