
Desserts
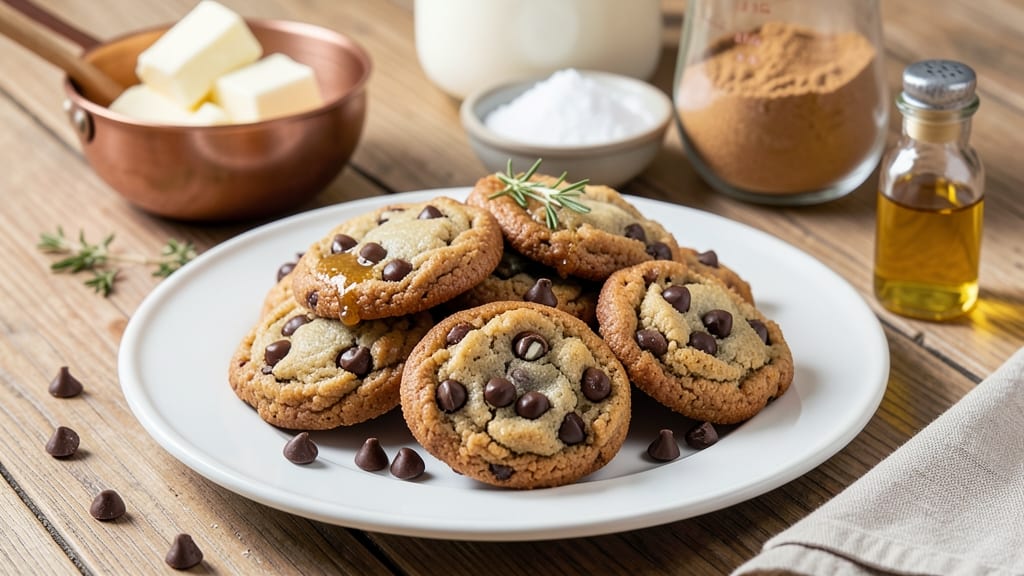
Chicago's legendary crunchy chocolate chip cookies deliver a double-baked texture with crispy edges and molten centers that set them apart from traditional recipes. The secret lies in a precise blend of brown and white sugar, corn syrup for chewiness, and a higher butter-to-flour ratio that creates that signature crackly exterior.
I've perfected this recipe after years of testing—each bite offers the perfect balance of crisp, caramelized edges and gooey chocolate pockets.
What makes these cookies truly special is the two-stage baking process: an initial bake to set the shape, followed by a second bake to develop that coveted crunch. The dough rests overnight for deeper flavor development, and the chocolate chips are added to the wet ingredients for even distribution.
Unlike softer cookies, these hold their shape while delivering that iconic Chicago texture that's impossible to resist.
The result is a cookie that's golden brown at the edges with a crackly exterior that gives way to a tender, slightly chewy interior. The chocolate stays perfectly melty, and the buttery flavor lingers with every bite.
This isn't just another chocolate chip cookie—it's a textural experience that captures the essence of Chicago bakery perfection.
For that final touch, sprinkle with flaky sea salt while still warm to enhance the chocolate's sweetness. These cookies stay fresh for days, making them perfect for baking ahead and sharing. Let's get started on your first batch—your taste buds will thank you.
Ingredients for chicago crunchy chocolate chip cookies
Double-baked perfection starts with these precise ingredients—each playing its part for that iconic Chicago crunch.
| Ingredient | Amount | Notes |
|---|---|---|
| Unsalted Butter 🧈 | 1 ½ cups | Cold, cubed for even distribution |
| Light Brown Sugar 🍚 | 1 ½ cups | Packed, not scooped |
| White Granulated Sugar 🍚 | ½ cup | For crisp edges |
| Corn Syrup 🍯 | ¼ cup | Karo brand preferred |
| Large Eggs 🥚 | 2 whole | Room temperature |
| Pure Vanilla Extract 🌿 | 1 tbsp | High-quality, not imitation |
| All-Purpose Flour 🌾 | 3 ½ cups | Sifted, not pre-mixed |
| Baking Soda 🧂 | ½ tsp | Freshly measured |
| Diamond Crystal Kosher Salt 🧂 | 1 tsp | Not table salt |
| Semisweet Chocolate Chips 🍫 | 2 ½ cups | Enjoy Life brand for allergies |
| Flaky Sea Salt 🧂 | ¼ tsp | For final sprinkle |
The butter-to-flour ratio is non-negotiable here. European-style butter (like Plugrá) has higher fat content, which gives you that signature crackly exterior. If you can only find regular butter, chill it for 48 hours before using. The brown sugar? Light, not dark—it caramelizes better for that golden edge. I always grab mine from Whole Foods or Trader Joe's because their packaging keeps it fresh longer. The corn syrup might sound odd, but it's what creates that chewy center while keeping the edges crisp. Karo brand is your best bet—it's what bakeries use.
No corn syrup? Substitute with an extra 0.25 cup of brown sugar, but expect slightly less chew. Chocolate chips can be swapped for chopped chocolate bars (use the same amount), but they won't melt as evenly. The vanilla extract is where you shouldn't cut corners—imitation vanilla will make these taste artificial. For the flour, King Arthur or Gold Medal are my go-tos, but any all-purpose will work. If you're gluten-free, swap for a 1:1 baking blend but add an extra 0.5 tsp xanthan gum. The flaky sea salt is key for that final touch—Maldon or Jacobsen are the gold standards, but any flaky salt will do in a pinch.
This dough needs 24 hours of chilling—don't skip it. Store it in an airtight container in the fridge. The baked cookies stay fresh for 5-6 days in a sealed container at room temperature, and they actually improve overnight. For longer storage, freeze the baked cookies (without the salt) for up to 3 months. Reheat in a 350°F oven for 3-5 minutes to restore that crispy texture. I always bake a double batch—half for sharing, half for sneaking when no one's looking.
Why You'll Love This Recipe
- No Mixer Needed: I swear by this recipe’s creamy butter-and-sugar combo—it’s the kind of dough you can mix with a sturdy spoon or even your hands. The corn syrup keeps it soft enough to scoop without overworking, and honestly? I’ve made these while chatting on the phone. No fuss, no stress.
- Chewy-Crunch Core: That crispy exterior with a gooey center? It’s all in the brown sugar-to-butter ratio. The eggs bind just enough to hold the chocolate chips in place while baking, but the real magic happens when the edges get that perfect snap. Between us, I’ve been known to eat these straight from the pan.
- Party in a Jar: These freeze like a dream—just toss cooled cookies in a container with parchment between layers. Need a last-minute gift? Wrap a batch in cellophane with a ribbon. (Yes, even on a Tuesday night.) They’re my go-to for teacher gifts, office potlucks, or when I’m too lazy to bake.
- Budget Buster: A single batch uses less than $5 of ingredients, and the butter and sugar stretch across multiple uses. The corn syrup might sound fancy, but it’s the secret weapon that keeps these cookies tender without breaking the bank. My daughter picks out the chocolate chips first, but I always save the last one.
Step-by-step instructions for Chicago crunchy chocolate chip cookies
Here's the method that delivers that iconic Chicago double-bake crunch with molten centers every time.
Cream Butter and Sugars to Peak Volume
In a stand mixer fitted with the paddle attachment, beat the 1.5 cups unsalted butter (cold and cubed) on medium speed until smooth, about 2 minutes. This cold start prevents excess spreading. Gradually add the 1.5 cups packed light brown sugar and 0.5 cup white granulated sugar, mixing continuously until the mixture lightens in color and nearly doubles in volume—this should take about 4-5 minutes.
I press down on the dough with a spatula occasionally to ensure even creaming. You're looking for a texture that's light and fluffy, almost like whipped butter—this incorporates air that will create those signature crackly tops. If the mixture feels too soft, chill it for 15 minutes before proceeding.
Incorporate Wet Ingredients and Dry Mixture
Add the 0.25 cup corn syrup and mix for 30 seconds to combine completely. The syrup helps create that signature chewy texture while maintaining crisp edges. Add the 2 whole large eggs one at a time, mixing just until each is fully incorporated after about 30 seconds per addition.
In a separate bowl, whisk together the 3.5 cups all-purpose flour, 0.5 teaspoon baking soda, and 1 teaspoon Diamond Crystal kosher salt. With the mixer on low speed, gradually add the dry mixture to the wet ingredients, mixing just until combined—about 30-45 seconds. Overmixing develops gluten, which leads to tough cookies. Stop mixing as soon as you see a few flour streaks remaining.
Fold in Chocolate Chips and Chill
Remove the bowl from the mixer and gently fold in the 2.5 cups semisweet chocolate chips using a silicone spatula. I like to press the dough together firmly to ensure even distribution of chocolate throughout. The dough will be thick and slightly sticky—this is normal.
Cover the bowl with plastic wrap and refrigerate for at least 3 hours or up to 24 hours. This extended chilling period is crucial for developing maximum flavor and achieving that signature Chicago crunch. The cold dough prevents excessive spreading during baking and allows the flour to fully hydrate for better texture.
First Bake for Structure
Preheat your oven to 350°F and line two baking sheets with parchment paper. Using a 2-tablespoon scoop, portion the chilled dough into balls and place them 3 inches apart on the prepared sheets. Flatten each ball slightly with your palm—just enough to create a ½-inch thick cookie.
Bake for 12-14 minutes until the edges are golden brown but the centers still look slightly underdone. They'll continue cooking on the hot sheet after removal. The cookies should be set around the edges but still soft in the center. Remove from the oven and let cool on the baking sheet for 5 minutes before transferring to a wire rack.
Double-Bake for Ultimate Crunch
Return the baked cookies to the oven and bake for an additional 8-10 minutes at 350°F. This second bake ensures maximum crispness while maintaining that molten center. The cookies should be completely firm to the touch with a deep golden color.
While still warm, sprinkle each cookie with a pinch of 0.25 teaspoon flaky sea salt for that signature Chicago touch. Let the cookies cool completely on the wire rack before serving. The contrast of crispy exterior with gooey center is what makes these cookies legendary—worth every minute of the double-bake process.
Pro Tips For Making Chicago Crunchy Chocolate Chip Cookies
- CREAM THE BUTTER WELL: Don’t just mix—beat the butter and sugars until the bowl is visibly paler, with ribbons that hold for 5 seconds. I used to skimp here, but this is what gives those cookies their signature crisp edges and chewy centers. (Yes, it takes 3-4 minutes—no shortcuts.)
- USE COLD BUTTER AND EGGS: Pull your butter straight from the fridge and chill your eggs for 10 minutes before adding them. Warm eggs make the dough spread too much, and soft butter melts into a greasy mess instead of creating those perfect crunchy pockets. Trust me, the first batch I messed this up on was a sad, flat disaster.
- FLATTEN THE DOUGH BALLS: Press each dough ball into a ½-inch-thick disc before baking—don’t roll it into a perfect sphere. This ensures even baking and prevents the edges from getting too crisp while the centers stay soft. (And yes, your cookies will look less "cute" but taste way better.)
- BAKE IN WAVES, NOT ALL AT ONCE: Preheat the oven to 375°F, then bake cookies in single layers on the middle rack, spaced 2 inches apart. Crowding the pan steams the dough, making them spread into flat, sad pancakes. Give them room to rise and crisp properly—your future self will thank you.
Flavor customization for this recipe
Sweet-Salty Variations
Add ½ cup white chocolate chips or dark chocolate chunks to the dough for a decadent twist. I often swap 1 cup of the semisweet chocolate chips for white chocolate—the contrast of sweetness with the flaky salt is pure magic.
For extra indulgence, fold in ¼ cup chopped toasted pecans after chilling the dough. 🌟
Spiced Chicago Twist
Infuse the dough with 1 teaspoon cinnamon and ½ teaspoon cardamom for a warm, aromatic variation. These spices complement the chocolate beautifully while adding depth. For heat lovers, add ½ teaspoon cayenne to the dry ingredients—it balances the sweetness perfectly.
I’ve also tried orange zest in place of vanilla for a citrusy kick.
Cookie Size Experiment
Play with portion sizes for different textures. Use a 1.5-tablespoon scoop for smaller, crispier cookies that bake faster. For giant Chicago-style cookies, go up to 3 tablespoons—they’ll need 16-18 minutes in the first bake and 10-12 minutes in the second.
The larger size creates an even crunchier exterior with a gooey center.
Gluten-Free Adaptation
Replace the all-purpose flour with a 1:1 gluten-free baking blend (like Bob’s Red Mill) and add ½ teaspoon xanthan gum. Reduce the baking time by 2-3 minutes in each stage—gluten-free dough spreads less but can dry out faster.
For extra moisture, add 1 tablespoon melted butter to the dough. The texture won’t be identical, but it’s still delicious!
Flavor Layering
Create a layered flavor experience by adding ½ cup crushed pretzels to the dough for a salty crunch. Or, fold in ¼ cup chopped dried cranberries with the chocolate chips for a tart contrast.
For a boozy twist, mix 1 tablespoon bourbon into the wet ingredients—it enhances the caramelization during baking. 🍫
Nutrition facts
Frequently asked questions
Why do Chicago crunchy cookies need two baking stages?
The double-bake process is what creates that signature crackly exterior while keeping the center gooey. The first bake sets the shape and partially cooks the edges, while the second bake develops maximum crispness without overcooking the center. This two-step method ensures you get that iconic Chicago texture that's crispy on the outside with a molten chocolate core.
Can I make these cookies without corn syrup?
Yes, but your cookies will be slightly less chewy. Substitute with an extra 0.25 cup of brown sugar—this helps maintain some moisture while still achieving that crispy edge. The corn syrup is what creates that perfect balance between crisp and chewy textures that makes these cookies special.
How do I prevent my cookies from spreading too much?
Chill your dough for the full 24 hours—this is non-negotiable for Chicago-style cookies! Also, make sure your butter is cold when you start and don't overmix the dough. Portion the dough balls evenly and flatten them just enough to create ½-inch thick cookies. The double-bake process helps set their shape perfectly.
What's the best way to store these cookies?
Store them in an airtight container at room temperature for up to 5-6 days. For longer storage, freeze the baked cookies (without salt) for up to 3 months. To restore crispness after freezing, warm in a 350°F oven for 3-5 minutes. The flavor actually improves overnight!
Can I use regular table salt instead of kosher salt?
No—never substitute! The recipe calls for Diamond Crystal kosher salt because it's coarser and measures differently. If you must use table salt, reduce the amount by half (use 0.5 teaspoon instead of 1 teaspoon). The flaky sea salt for finishing is also essential for that signature Chicago taste contrast.