
Desserts
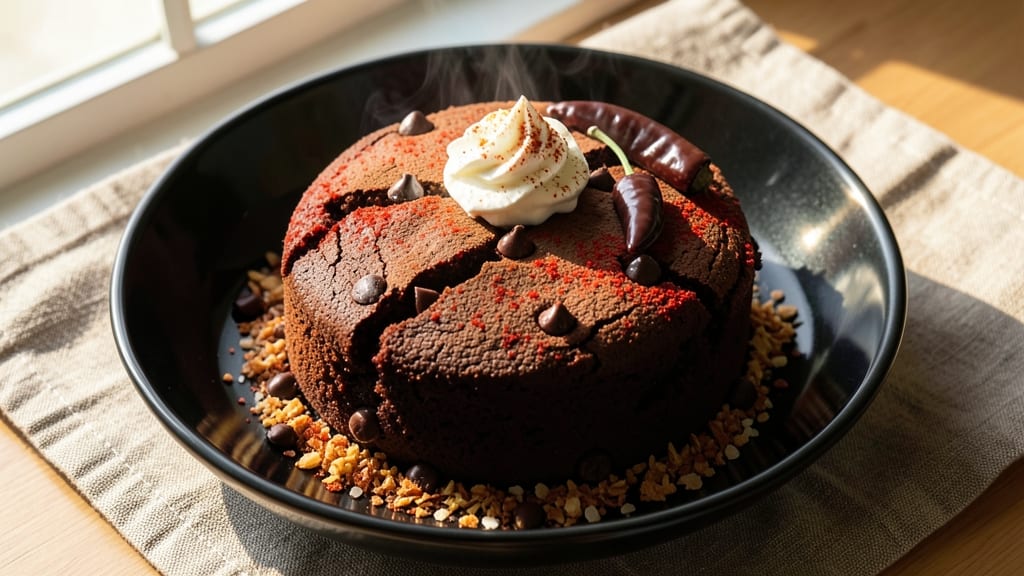
This chilli chocolate cake recipe delivers a bold, unexpected twist on classic chocolate cake—where deep, dark chocolate meets subtle heat from chili powder. The secret lies in balancing sweetness and spice, creating a rich, moist cake with a molten lava center that lingers with every bite.
I've perfected this recipe over years of baking experiments, ensuring the chili heat never overpowers the chocolate's intensity.
The cake itself is dense and fudgy, with a tender crumb that holds its shape while still feeling indulgent. What makes it special is the lava center—chocolate ganache that stays gooey even after baking, providing a surprise burst of flavor.
The chili powder is distributed evenly throughout the batter, adding warmth without sharpness, while a pinch of cinnamon and cayenne enhances the complexity.
By the time you slice into this cake, you'll experience a perfect harmony of flavors—dark chocolate's bitterness, the subtle kick of chili, and the creamy richness of the lava center.
The result is a dessert that feels sophisticated yet approachable, ideal for impressing guests or treating yourself after a long week. Serve it warm with a dusting of cocoa powder or a dollop of whipped cream to elevate the experience.
This recipe is designed to be foolproof, with clear instructions for achieving that signature lava effect and balancing the spice levels to your preference.
Whether you're a seasoned baker or new to the kitchen, the techniques here will guide you to a showstopping dessert that's as delicious as it is visually striking. Let's get started!
Ingredients for chilli chocolate cake
Eight servings of bold flavors—where deep chocolate meets subtle chili heat for a showstopping dessert.
| Ingredient | Amount | Notes |
|---|---|---|
| All-Purpose Flour 🌾 | 2 ½ cups | Sifted for even texture |
| Dark Chocolate Chips 🍫 | 2 cups | 70% cocoa or higher |
| Granulated Sugar 🍚 | 2 cups | Light brown sugar for depth |
| Unsalted Butter 🧈 | 1 ½ cups | Room temperature, cubed |
| Large Eggs 🥚 | 4 whole | Room temperature for blending |
| Chili Powder 🌶️ | 1 tbsp | Sweet or mild variety |
| Ground Cinnamon 🍃 | 1 tsp | Freshly ground preferred |
| Cayenne Pepper 🔥 | ¼ tsp | Adjust for heat preference |
| Vanilla Extract 🌿 | 2 tsp | Pure vanilla preferred |
| Baking Powder 🍞 | 1 tsp | Freshly measured |
| Salt 🧂 | ½ tsp | Diamond Crystal preferred |
| Semisweet Chocolate Chips 🍫 | 1 ½ cups | For lava center |
| Heavy Cream 🥛 | ½ cup | Full-fat for richness |
| Unsweetened Cocoa Powder 🍫 | ¼ cup | Dutch-processed preferred |
| Powdered Sugar 🍚 | ½ cup | For dusting |
The chocolate is non-negotiable here. Ghirardelli 70% or higher dark chocolate chips ensure that rich, bittersweet base that balances the chili heat. I always grab the Ghirardelli baking chips—they melt perfectly without seizing. The cocoa powder? Dutch-processed (like Hershey's Special Dark) gives that smooth, velvety texture. For the butter, Land O'Lakes unsalted is my go-to—it's reliable and melts evenly. If you're feeling fancy, European-style butter like Plugrá adds extra richness, but it's not required. The chili powder should be sweet—not cayenne—unless you're going for a spicier kick.
No dark chocolate chips? Chop up a 7-ounce bar of dark chocolate instead—just make sure it's 70% cocoa or higher. Running out of vanilla? Vanilla bean paste works too, but pure extract is ideal. The baking powder needs to be fresh—if it's over a year old, test it first by mixing with water and seeing if it bubbles. For the lava center, heavy cream must be full-fat—the fat content keeps it gooey. No heavy cream? Whipped coconut cream is a decent substitute, though it'll be lighter. The powdered sugar is just for dusting, so any brand will do—just make sure it's 10X sifted for that perfect cloud.
This cake keeps beautifully for 3 days at room temperature, wrapped tightly in plastic. For longer storage, refrigerate for up to 1 week or freeze for 3 months. I like to slice it ahead of time and store the pieces in an airtight container—just let them sit at room temperature for 10 minutes before serving. The lava center reheats beautifully in the microwave for 10-15 seconds if you want it extra gooey. Serve with a dollop of whipped cream or vanilla ice cream to balance the heat.
Why You'll Love This Recipe
- You’re using pantry staples: flour, sugar, butter, eggs—plus a bag of chocolate chips you already had. No fancy ingredients, no wasted leftovers (this cake keeps for days), and it costs a fraction of what a bakery version would. Win.
- No Mixer Needed: I swear by this recipe when I’m in a rush—just cream the butter and sugar by hand (or use a fork, no shame), then fold in the chocolate chips and flour. The eggs come together in a snap, and the batter’s so thick you won’t overmix it.
- Spicy-Sweet Magic: That first bite? Rich, fudgy chocolate with a hint of chilli—like a warm hug for your taste buds. The dark chocolate chips melt into pockets of gooey bliss, while the chilli adds just enough kick to keep it interesting (no sugar crash here).
- Date Night or Meal Prep: Bring it to a dinner party for a showstopper that’s actually easy, or bake a batch on Sunday and stash slices in the freezer for lazy mornings. Honestly, it’s just as good cold as it is warm—perfect for breakfast or dessert.
Step-by-step instructions for chili chocolate cake
This spiced chocolate lava cake delivers bold heat and rich cocoa depth with a molten center.
Prepare the Spiced Chocolate Batter
Preheat your oven to 350°F and position a rack in the center. In a medium bowl, whisk together the 2.5 cups all-purpose flour, 1 tsp baking powder, 0.5 tsp salt, 1 tbsp chili powder, 1 tsp ground cinnamon, and 0.25 tsp cayenne pepper. Sift this dry mixture into a large mixing bowl to aerate it—this prevents dense cake.
In a separate large bowl, cream the 1.5 cups unsalted butter and 2 cups granulated sugar on medium speed until light and fluffy, about 3-4 minutes. Add the 4 whole large eggs, one at a time, mixing well after each addition. Scrape down the sides of the bowl to ensure even incorporation. Stir in the 2 tsp vanilla extract and 0.25 cup unsweetened cocoa powder until smooth.
Combine Wet and Dry Ingredients
Gradually add the sifted dry ingredients to the wet mixture, mixing on low speed just until combined. Avoid overmixing—you should still see small flour streaks. Fold in 2 cups dark chocolate chips and 1.5 cups semisweet chocolate chips by hand using a rubber spatula, ensuring even distribution throughout the batter.
Here's the thing—this batter needs to be thick but pourable. If it seems too stiff, add 1-2 tablespoons heavy cream to loosen it slightly. The goal is a consistency that holds its shape when dropped but still flows smoothly into the pans.
Create the Lava Centers
Divide the batter evenly among 8 (6-ounce) ramekins, filling each about ¾ full. Place the ramekins on a baking sheet. Using a small spoon, create a well in the center of each ramekin—about 1 inch deep. Press a 1-inch piece of semisweet chocolate chip into the center of each well, leaving the top exposed.
This creates the signature lava effect. The chocolate in the center melts during baking while the edges remain firm. For best results, use room-temperature chocolate chips—they'll melt more evenly and create a smoother lava flow.
Bake to Golden Perfection
Bake for 18-20 minutes until the edges are set and the tops are golden brown. The centers should still appear slightly underdone—they'll continue cooking as they cool. Here's the critical part: insert a toothpick into the center of one cake. It should come out with a few moist crumbs but no wet batter.
If the tops brown too quickly, tent the ramekins loosely with aluminum foil after 12 minutes to prevent overbrowning while the centers finish setting. Remove from the oven and let cool for 2 minutes before carefully inverting each cake onto individual plates.
Finish with Cream and Dust
While the cakes are still warm, drizzle each with 1 teaspoon heavy cream to create a glossy sheen. Dust generously with 0.5 cup powdered sugar using a fine-mesh sieve for an elegant finish. Serve immediately for the ultimate molten chocolate experience—each bite combines warm, spiced cake with liquid chocolate center and a hint of chili heat.
For maximum drama, serve with vanilla ice cream or whipped cream. The contrast between the warm cake and cold topping enhances both flavors. Store any leftovers covered at room temperature for up to 2 days, but they're best enjoyed fresh from the oven.
Pro Tips For Making Chilli Chocolate Cake
- MELT CHOCOLATE SLOWLY: I learned this the hard way—dumping chopped chocolate into hot butter makes it clump like a science experiment gone wrong. Instead, melt the butter first, then sprinkle in the dark chocolate chips in small batches, stirring constantly until just smooth. The goal is to avoid steam, which turns chocolate into a grainy mess.
- SIFT THE FLOUR: Skipping this step means you’re fighting with lumps in your batter. Sift the all-purpose flour directly into the mixing bowl before adding dry ingredients—it aerates the batter and guarantees a lighter, less dense cake. (Yes, even if you’re impatient like me.)
- DON’T OVERMIX THE BATTER: The moment the flour hits the wet ingredients, stop mixing as soon as it comes together. Overworking it develops gluten, and your cake will turn out tough instead of tender. Fold in the chocolate chips by hand after—no need to stir them in.
- BAKE UNTIL SPRINGY: A toothpick test is overrated for this cake. Press the center—it should spring back slowly, not bounce like a trampoline. If it’s still wet, give it 5 more minutes. Underbaking leaves it gummy; overbaking dries it out. (Your future self will thank you.)
Make-ahead tips for chilli chocolate cake
Prep Ahead Strategy
Start by making the batter 24 hours ahead and store it in an airtight container in the fridge. This allows the spices to meld beautifully, deepening the chili-chocolate flavor profile.
Just give it a quick whisk before baking—no need to worry about lumps if stored properly. The batter keeps well for up to 3 days this way. 💫
Lava Center Prep
Prepare the semisweet chocolate chip lava centers the night before by pressing them into the wells of your ramekins. Cover the ramekins with plastic wrap and refrigerate.
When ready to bake, simply pop them out and proceed with the recipe. This ensures your chocolate stays perfectly firm for that signature molten effect. 🍫
Baking in Advance
Bake the cakes 1 day ahead and store them at room temperature in an airtight container. Reheat individual portions in the microwave for 10-15 seconds to restore that gooey lava center.
The texture remains moist, and the flavors actually intensify over time. I like to slice them ahead and store the pieces separately for easy serving. 🔥
Freezer-Friendly
For longer storage, bake the cakes and freeze them unfrosted on a tray before transferring to a freezer bag. Thaw at room temperature for 1-2 hours—no need for the microwave.
The cake's structure holds up well, and the lava center reheats beautifully when warmed briefly. This is perfect for last-minute gatherings! ❄️
Portion Control
Divide the batter into individual ramekins the night before and refrigerate. This makes baking a breeze—just pop them in the oven when ready. For a party, bake all ramekins at once and store the finished cakes in the fridge.
Serve straight from the fridge for a cooler contrast, or let them sit at room temperature for 10 minutes before serving to enhance the molten experience. 💡
Make-Ahead Garnishes
Prep your toppings in advance: dust powdered sugar through a sieve and store it in a small jar. Whip your cream or make your ice cream topping the day before. This way, you only need to assemble everything right before serving.
The garnishes stay fresh for 2 days in the fridge, ready to elevate your cake at the last minute. ✨
Nutrition facts
Frequently asked questions
Can I adjust the spice level in this chilli chocolate cake?
The recipe uses 1 tbsp chili powder and 0.25 tsp cayenne for a subtle warmth. For more heat, add an extra 0.25 tsp cayenne or swap in smoked paprika. If you prefer milder heat, reduce the cayenne to 0.125 tsp or omit it entirely. Always taste the batter before baking—you can adjust the spice while mixing!
Why does my cake need a lava center?
The lava center creates that signature molten surprise! The semisweet chocolate chips placed in the middle melt during baking, creating a gooey contrast to the firm edges. This technique balances texture—each bite delivers warm cake with a burst of liquid chocolate. For extra richness, use 70% cocoa dark chocolate in the center.
Can I make this cake in a regular cake pan instead of ramekins?
Yes, but the lava effect won't be as dramatic. For a traditional cake, bake in a 9x13-inch pan at 350°F for 30-35 minutes. Skip the chocolate center and fold 2 cups chocolate chips into the batter instead. The result will be a rich, spiced chocolate cake without the molten surprise.
How do I store leftovers to keep the lava center gooey?
Store individual cakes in an airtight container at room temperature for 2 days. For longer storage, refrigerate for 1 week. To restore the lava center, microwave each slice for 8-10 seconds—just enough to melt the chocolate without drying the cake.
What's the best way to serve this cake?
Serve warm with a dusting of powdered sugar and a dollop of whipped cream or vanilla ice cream to balance the heat. For a tropical twist, add passion fruit compote or fresh berries. The contrast of cold and warm enhances both the chocolate and chili flavors!