
Desserts
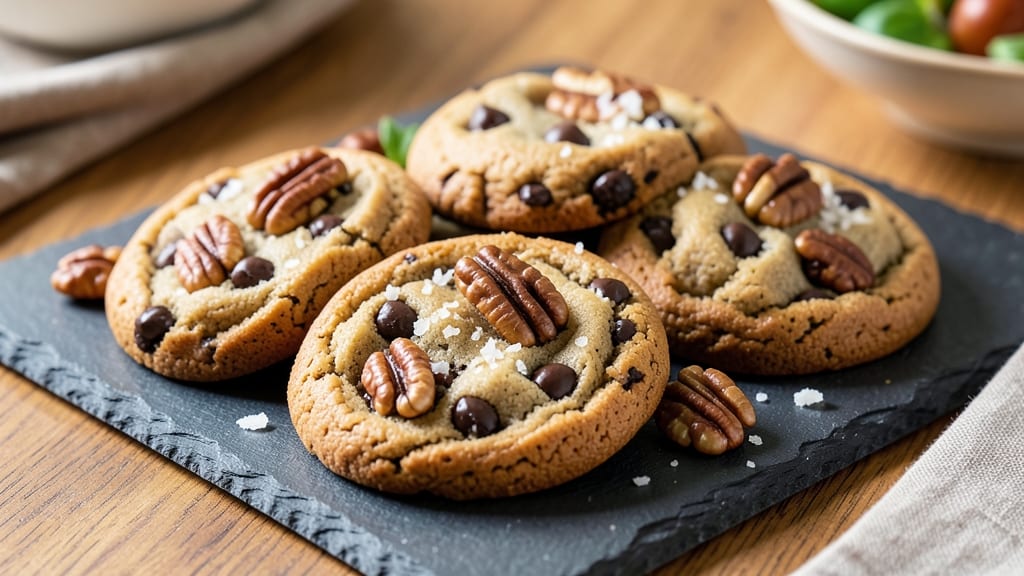
This chewy chocolate chip walnut cookies recipe delivers the perfect balance of nutty crunch and gooey centers—every bite is a revelation. 🔥 The secret lies in brown sugar for chewiness and toasted walnuts that add depth, while semi-sweet chocolate chips melt into decadent pockets.
I’ve perfected this recipe over years of baking, ensuring the edges stay crisp while the centers remain soft and fudgy.
The dough gets chilled for 24 hours (trust me, it’s worth it), which develops flavor and prevents spreading. You’ll need just 10 ingredients, including melted butter for maximum richness and a pinch of salt to enhance all the sweetness.
The walnuts should be toasted and chopped finely so they distribute evenly throughout each cookie.
Bake at 350°F for 10–12 minutes—no overbaking here—until the edges are golden but the centers still look slightly underdone. That’s when you know they’re perfect. The aroma alone will have everyone gathering in the kitchen, and the first bite delivers that irresistible combination of crisp, chewy, and melty.
These cookies are ideal for holiday gifting, potlucks, or satisfying a late-night craving. Double the batch—they disappear fast. Let’s get baking!
Ingredients for chewy chocolate chip walnut cookies
Ten simple ingredients transform into cookies with crisp edges and gooey centers—walnuts add crunch while chocolate melts perfectly.
| Ingredient | Amount | Notes |
|---|---|---|
| Unsalted Butter 🧈 | 1 cup | Melted, full-fat for richness |
| Light Brown Sugar 🍚 | 1 ½ cups | Packed tightly, not loosely |
| Granulated Sugar 🍚 | ½ cup | For balanced sweetness |
| Large Eggs 🥚 | 2 whole | Room temperature for even mixing |
| Vanilla Extract 🌿 | 2 tsp | Pure, high-quality vanilla |
| All-Purpose Flour 🌾 | 3 ½ cups | Sifted, spooned and leveled |
| Baking Soda 🧂 | 1 tsp | Ensures proper rise |
| Salt 🧂 | ½ tsp | Kosher or sea salt |
| Semi-Sweet Chocolate Chips 🍫 | 2 cups | High-quality, not chips |
| Walnuts 🥜 | 1 ½ cups | Toasted, finely chopped |
The butter is non-negotiable here—unsalted, full-fat for maximum richness. I always grab Land O’Lakes or Plugrá from the grocery store, but Trader Joe’s has the best price for European-style butter if you want to splurge. Brown sugar is key for that signature chewiness—pack it tightly into the measuring cup, don’t scoop it loosely. For the walnuts, toast them in a dry pan until fragrant (about 5 minutes), then chop them finely so they distribute evenly. Pre-chopped nuts from the store won’t give you the same texture—trust me on this.
No vanilla extract? Vanilla bean paste works in a pinch, or even 1 tsp vanilla sugar if you're desperate. Short on chocolate chips? Chop up a chocolate bar—just make sure it’s semi-sweet, not milk chocolate. The flour should be all-purpose, not cake flour, and I always sift it to avoid lumps. For the eggs, room temperature is ideal, but if they're cold, just let them sit out for 30 minutes. The dough gets chilled for 24 hours, which develops flavor and prevents spreading—don’t skip this step even if you're eager to bake.
This dough keeps beautifully in the fridge for up to 5 days, wrapped tightly in plastic. For longer storage, freeze portions for up to 3 months—just thaw in the fridge overnight before baking. The walnuts should be toasted and chopped fresh before mixing, but you can store pre-toasted nuts in an airtight container for 1 week if you want to prep ahead. Bake only what you can eat in 2 days—these disappear fast, especially when you're testing batches.
Why You'll Love This Recipe
- No-Fuss Mixing: The dough comes together in one bowl—no chilling, no fancy techniques. Just cream the butter and sugars until light, crack in eggs, and fold in the chocolate chips and walnuts. Honestly, my kids help measure the brown sugar, and we still end up with perfect cookies.
- Chewy Magic: That brown sugar caramelizes into a thick, buttery base while the walnuts add a satisfying crunch. Between us, the first bite always gets a "whoa" from everyone—especially when the edges stay soft for days.
- Party in a Jar: These bake up fast, so I double the batch for gatherings. Pack them in mason jars for teacher gifts, stash some in the freezer for last-minute hostess favors, or just eat half before anyone notices. (Yes, even on a Tuesday night.)
- Budget-Friendly Staples: Butter, sugar, eggs—you’re using pantry basics that won’t break the bank. A single batch makes 24 cookies, and leftovers? They last forever in an airtight container. My wallet (and my taste buds) thank me every time.
Step-by-step instructions for chewy chocolate chip walnut cookies
Here's how to make cookies with that perfect chewy texture and nutty crunch—every time.
🍳 Step 1: Cream Butter and Sugars to Fluffy Perfection
In a stand mixer fitted with the paddle attachment, combine the 1 cup unsalted butter with the 1.5 cups light brown sugar and 0.5 cup granulated sugar. Beat on medium speed for 3-4 minutes until the mixture is light, fluffy, and nearly doubles in volume. You're looking for a pale, ribbon-like consistency that leaves clean streaks when the paddle lifts.
This creaming process incorporates air into the dough, which creates those signature crackly tops and chewy centers. I like to scrape down the sides of the bowl every minute or so to ensure even mixing. If your butter isn't soft enough, microwave it in 10-second bursts until it's pliable but not melted—this makes all the difference in texture.
👨🍳 Step 2: Mix in Eggs and Vanilla for Richness
Add the 2 whole large eggs, one at a time, mixing on low speed for 30 seconds after each addition. Then stir in the 2 teaspoons vanilla extract until fully combined. The mixture will look slightly curdled at first, but don't worry—it will come together when you add the dry ingredients.
Here's the thing—room temperature eggs mix more smoothly and create a more uniform dough. If your eggs are straight from the fridge, let them sit in warm water for 5 minutes before using. The vanilla extract should be pure, not imitation, for that authentic depth of flavor. Give it a quick sniff to confirm it's fresh before adding.
🥘 Step 3: Combine Dry Ingredients and Fold in Chocolate and Nuts
In a separate bowl, whisk together the 3.5 cups all-purpose flour, 1 teaspoon baking soda, and 0.5 teaspoon salt. Gradually add this mixture to the wet ingredients, mixing on low speed for 30-45 seconds until just combined. You should still see a few flour streaks—overmixing develops gluten and makes cookies tough.
Remove the bowl from the mixer and gently fold in the 2 cups semi-sweet chocolate chips and 1.5 cups toasted, finely chopped walnuts using a silicone spatula. I like to press the walnuts into the dough slightly so they're evenly distributed. The chocolate chips should be high-quality—they make a noticeable difference in flavor and texture. If your walnuts aren't toasted, spread them on a baking sheet and toast in a 350°F oven for 8-10 minutes until fragrant.
⏰ Step 4: Chill the Dough for Better Texture
Cover the dough bowl with plastic wrap and refrigerate for at least 1 hour—I prefer 2 hours or even overnight. Chilling solidifies the butter, which prevents the cookies from spreading too thin in the oven. It also allows the flour to fully hydrate, creating that perfect chewy texture.
Don't skip this step (I learned the hard way). Cold dough holds its shape better, resulting in thicker cookies with crispy edges and gooey centers. If you're in a hurry, you can chill the dough for 30 minutes in the freezer, but I find the longer chill gives the best results. While it chills, preheat your oven to 375°F and line two baking sheets with parchment paper.
🔥 Step 5: Bake to Golden, Gooey Perfection
Scoop the chilled dough into 2-tablespoon portions (I use a cookie scoop for uniform size) and place them 3 inches apart on the prepared baking sheets. Bake for 10-12 minutes until the edges are golden brown but the centers still look slightly underdone. They'll continue cooking on the hot pan after you remove them from the oven.
Watch them closely during the last 2 minutes—you want them to be just set in the middle with a slight crack in the top. If you prefer softer cookies, pull them out when the edges are barely golden. Let them cool on the baking sheet for 5 minutes before transferring to a wire rack. Serve warm for the ultimate experience—each bite should deliver that perfect balance of chewy texture, nutty crunch, and gooey chocolate pockets.
Pro Tips For Making Chewy Chocolate Chip Walnut Cookies
- CREAM THE BUTTER SLOW: I used to dump everything in the mixer and hit go—big mistake. Instead, let the butter sit at room temp for 30 minutes first, then beat it with the sugars on medium for at least 3 minutes until it’s pale and fluffy. That’s when the fat fully emulsifies, and your cookies won’t taste greasy or spread too much. (Yes, even if you’re impatient like me.)
- CHILL THE DOUGH LONGER: Skip the 30-minute rest—give it at least 2 hours (overnight works too). The gluten relaxes, the flavors meld, and the walnuts stay crisp instead of turning to mush. I learned this the hard way after a batch of sad, flat cookies. Trust the process—your future self will thank you.
- WEIGH THE BROWN SUGAR: That “packed” cup measure? It’s a lie. Brown sugar holds moisture differently, and too much means gummy cookies. Use a scale for precision—aim for 1:1 ratio with granulated sugar. If you must eyeball it, press the sugar firmly into the cup, but don’t overpack. (I still do this sometimes, and the cookies are fine—but not great.)
- BAKE UNTIL EDGES ARE GOLD: Pull them out when the edges are set but the centers still look soft—they’ll firm up as they cool. Overbaking is the fastest way to ruin chewy texture. A toothpick with moist crumbs (not wet batter) is your signal. I was skeptical until I tried it—now I resist the urge to peek.
Make-ahead tips for this recipe
Dough Prep Ahead
Make the dough up to 3 days in advance and store it in an airtight container in the refrigerator. I like to wrap the dough ball tightly in plastic wrap first, then place it in a quart-sized mason jar for easy handling.
This method keeps the dough perfectly shaped and ready to scoop—just roll out portions when you're ready to bake. The flavors actually deepen over time, making the cookies even more delicious. 🥫
Freezer-Friendly Dough
For longer storage, divide the dough into 12 equal portions (about 2 tablespoons each) and flatten them slightly on a parchment-lined tray. Freeze until solid, then transfer to a freezer bag with parchment between layers.
Thaw in the fridge overnight before baking—this prevents condensation from making the dough soggy. I’ve kept dough frozen for up to 3 months with no texture loss. 🧊
Baked Cookies Storage
Let cookies cool completely before storing in an airtight container with parchment paper between layers. They’ll stay fresh at room temperature for 5 days, but I recommend refrigerating them if you’re not eating them within 2 days.
For longer storage, freeze baked cookies for up to 3 months. Reheat in a 350°F oven for 3-5 minutes to restore that warm, gooey texture. 🍪
Make-Ahead Baking
Double the dough and bake half now, then freeze the remaining dough for later. When you’re ready to bake, simply thaw the dough in the fridge overnight and proceed with the recipe.
This is perfect for holiday baking—prepare everything in advance and bake fresh cookies whenever guests arrive. I often make two batches for parties and freeze one batch until needed. 🎄
Portion Control
Use a cookie scoop (I prefer a 2-tablespoon size) for uniform cookies that bake evenly. If you don’t have a scoop, use a small ice cream scoop or measuring spoons.
For extra-thick cookies, scoop 1.5 tablespoons of dough. The key is consistency—this ensures all cookies bake at the same rate and have that perfect chewy texture. 🍴
Gift-Wrapping Ready
Line a 13x9-inch baking pan with parchment paper and bake cookies in a single layer for easy gift wrapping. Once cooled, transfer them directly into clear cellophane bags tied with a ribbon.
Add a handwritten note or a small mini chocolate bar for a thoughtful touch. These cookies make fantastic gifts—they travel well and taste even better the next day. 🎁
Nutrition facts
Frequently asked questions
Why do these cookies need to chill for 24 hours?
Chilling the dough for 24 hours develops deeper flavor and prevents excessive spreading. The butter solidifies, creating thicker cookies with crisp edges and chewy centers. Plus, the flour hydrates fully for perfect texture—don't skip this step!
Can I substitute walnuts for another nut?
Try pecans or almonds for a different texture, but toast them first for maximum flavor. Pecans add buttery richness, while almonds offer a slightly sweeter crunch. Just chop them finely to distribute evenly.
How do I fix cookies that spread too much?
If your dough spreads excessively, chill it for 30 extra minutes before baking. Use a cookie scoop for uniform portions and place dough balls 3 inches apart on the baking sheet. Also, ensure your butter is properly chilled—this is the #1 cause of spreading.
What's the best way to store baked cookies?
Store in an airtight container with parchment paper between layers. They'll stay fresh at room temperature for 5 days, or freeze for up to 3 months. For extra freshness, add a slice of bread to absorb moisture and prevent drying.
Can I make these cookies gluten-free?
Yes! Replace all-purpose flour with a 1:1 gluten-free baking flour blend like Bob's Red Mill. Add 1 teaspoon xanthan gum to help bind the dough. Expect slightly denser cookies, but the chewy texture will still shine.